
Accessing Microsoft 365 with Monokee: possible with SAML 2.0 protocol
Accessing a Microsoft 365 tenant using Monokee is possible using the SAML 2.0 protocol. In this scenario Monokee will act as an Identity Provider (IDP) delivering identities to Microsoft 365 which will then act as a Service Provider (SP).
Specifically, this means that when a user of this Microsoft 365 tenant tries to log in to Microsoft 365, he will be redirected to the login page of the Monokee domain, which will authenticate the user and finally return to Microsoft 365 the user's information required for authentication on his side according to the dictates of the SAML 2.0 protocol.
This article explains how to integrate Microsoft 365 as a SAML 2.0 application in Monokee, starting with the configurations to be made on the Monokee, continuing with Office 365 side configurations and ending with the creation of the SAML application on the Monokee side.
Preliminary steps on the Monokee side
In order to be able to federate between a Microsoft 365 tenant and a Monokee domain, it is necessary to do some preliminary work on the Monokee side.
In particular, it is necessary for the Monokee domain, and thus the users in it, to have the required attributes that Microsoft will use to identify the user who wishes to log in, and to create the identity provider configuration of the Monokee domain.
User identification attributes for Microsoft 365
In order to identify the user, Microsoft needs the user's immutableID and email address from Azure.
We therefore assume that two custom attributes exist on the Monokee domain that contain this information, called AzureImmutableID and AzureIDPEmail respectively.
The first attribute AzureImmutableID will be sent as the subject in the authentication SAML Response, while AzureIDPEmail will be used to value an attribute to be included in the attribute statement of the response.
Creating these custom attributes and valuing them for domain users is outside the scope of this article.
Creation of the SAML 2.0 Identity Provider
We can proceed with the creation of an Identity Provider SAML 2.0 on the Monokee domain.
Below are the steps to follow with the specialized procedure for Microsoft 365.
Navigate to your Monokee custom fully qualified domain name (FQDN) or if you haven't set up a custom FQDN, go to Monokee's default page and enter your domain ID. Then, enter your login credentials to access your account.
Open the left sidebar and select SAML Providers from the menu.
This will display a two-tab page, choose the IDENTITY PROVIDERS tab. Click the Add button located in the top right corner.
Within the presented modal, in the General configuration section, enter the desired Name for your new provider, such as Microsoft 365 IDP SAML 2.0. Leave all other settings unchanged.
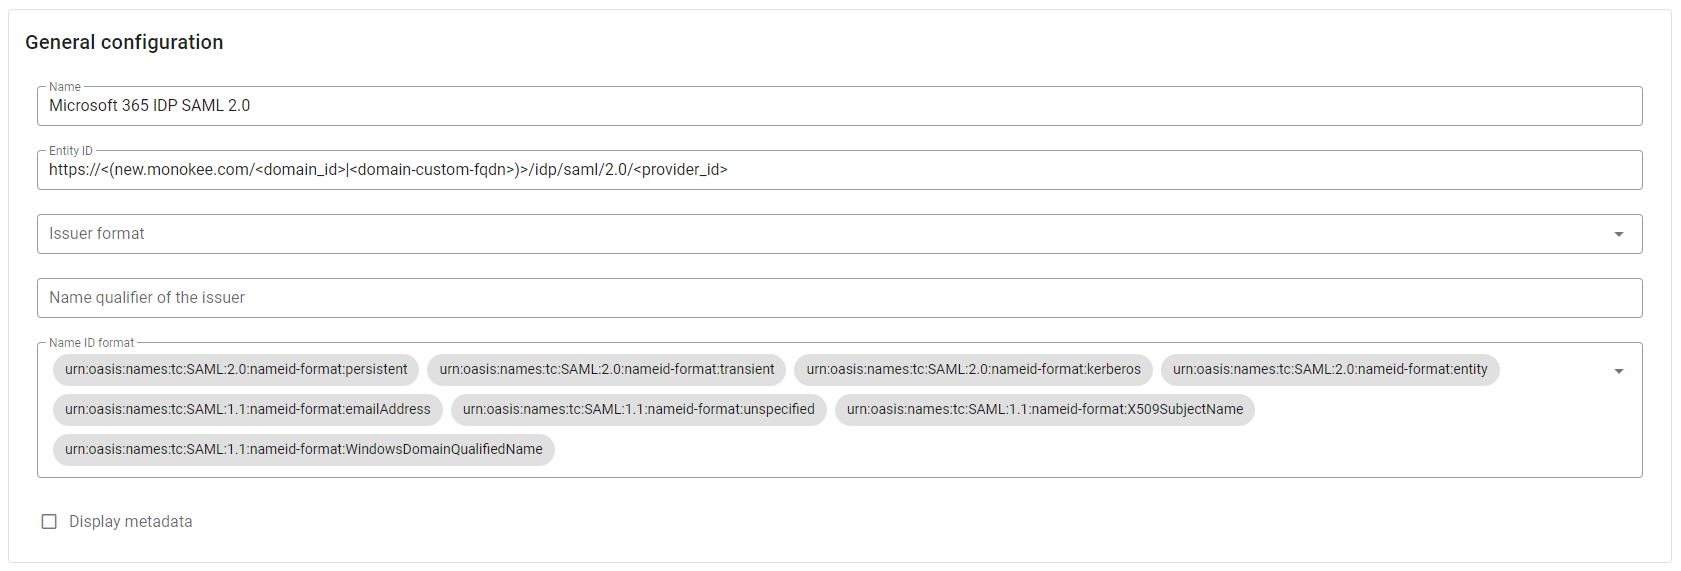
For this use case, it is not necessary to specify values for Organization and Contact person, so you can leave the fields of the two reference sections empty.
Microsoft 365 does not send signed Saml Requests, so the flag IDP requires signed authentication requests in Signing options section must remain unchecked by default.

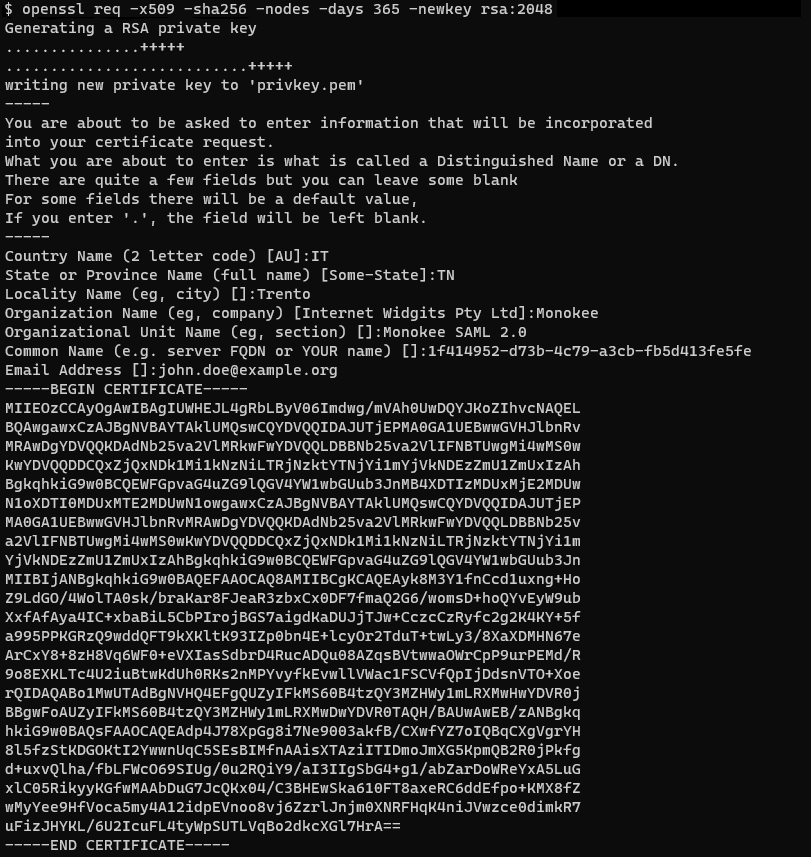
Load your PKCS1 Private Key and the corresponding Certificate in the Signature section. If you want you can generate this key-pair with the following openssl command:
openssl req -x509 -sha256 -nodes -days 365 -newkey rsa:2048A series of information will be asked, here's an example:
- Country Name: IT
- State or Province Name: TN
- Locality Name: Trento
- Organization Name: Monokee
- Organizational Unit Name: Monokee SAML 2.0
- Common Name: 1f414952-d73b-4c79-a3cb-fb5d413fe5fe
- Email Address: john.doe@example.org
cautionFor the Common Name you can use the <provider_id> generated by the EntityID

This command should output a certificate directly in the terminal and the private key will be placed in a file named privkey.pem. The private key will be in PKCS8 format so it must be converted to PKCS1 with the following command:
openssl pkey -in privkey.pem -traditionalThe new private key will be displayed in the terminal output.
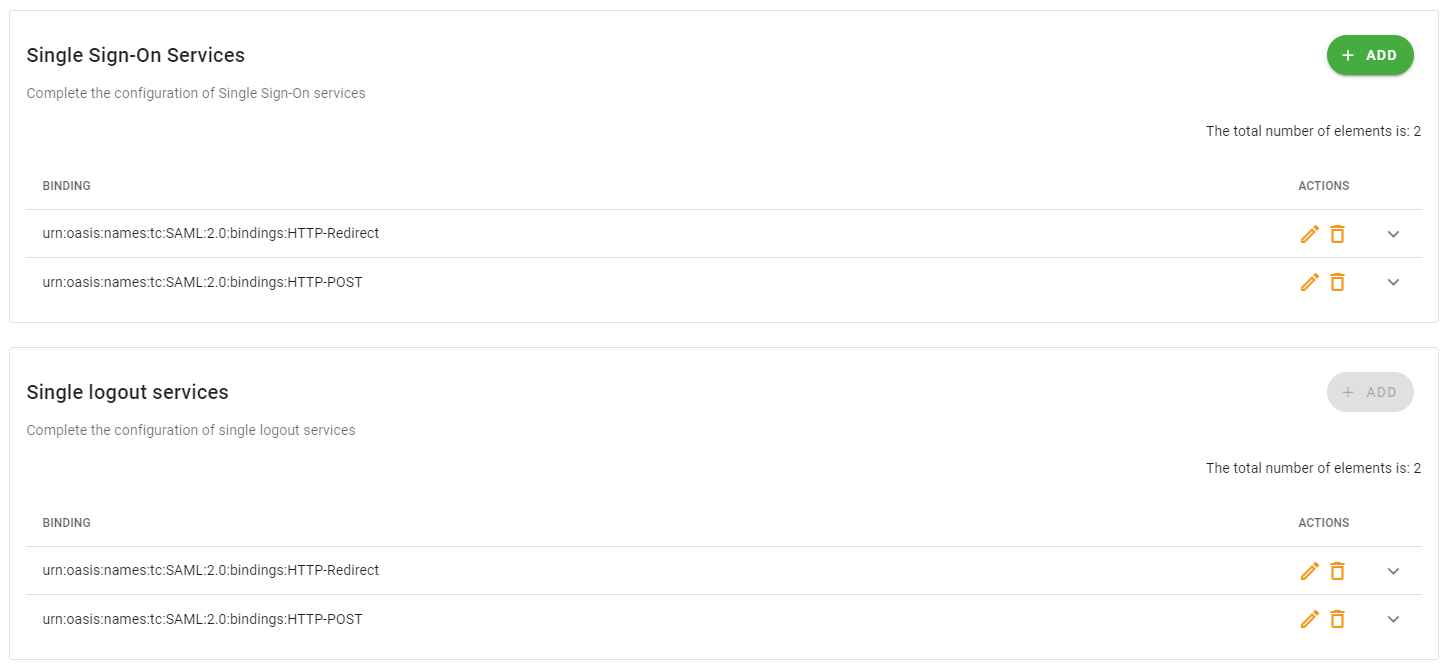
- Left untouched the Single Sign-On Services and Single Logout services configurations.
In the Attributes section, include the attribute IDPEmail which is the only attribute required by Microsoft 365 in addition to the subject for user authentication with SAML 2.0 protocol. To do so, follow these steps:
- Click on the Add button on the Attributes section, a dialogue will appear
- In the dialog, set IDPEmail as the value for both the Name and Descriptive Name fields
- Click the Add button of the dialogue to confirm the operation

- Click the bottom right Save button to save the configuration.
How to federate an Microsoft 365 tenant with Monokee
After completing the preliminary steps on the Monokee side, it is necessary to continue the configuration on Microsoft 365 so that it recognizes Monokee as an external Identity Provider.
Configuration must be done using the Microsoft Azure Active Directory Module for Windows PowerShell.
Once the application is open, you will need to log in with an administrative user using the commands:
$UserCredential = Get-Credential
Connect-MsolService -Credential $UserCredential
The former will show a pop-up asking you to enter credentials, while the latter will take care of the actual connection.
You can for convenience save the domain name in a variable through:
$dom=<microsoft365-tenant-hostname>
where microsoft365-tenant-hostname is the hostname of your Microsoft 365 tenant.
Once connected, to view the current configuration you need to type the command:
Get-MsolDomainFederationSettings
You will then be prompted for the domain name, and once indicated, the current configuration will be displayed.
To change the configuration, it is first necessary to put the domain in Managed mode by typing:
Set-MsolDomainAuthentication -DomainName $dom -Authentication Managed
Now we need to indicate the new configuration parameters, saved on variables:
$entityid=<monokee-idp-entity-id>
$ssourl=<monokee-idp-single-sign-on-services>
$slourl=<monokee-idp-single-logout-services>
$cert=<monokee-idp-signing-certificate>
where the specified fields should be replaced as follows:
- monokee-idp-entity-id is the entity ID of the Identity Provider SAML 2.0 created before, you can find this value in the Identity Provider configuration at the field Entity ID.
- monokee-idp-single-sign-on-services is the location of the Single Sign-On service of the Identity Provider. You can find the correct value on the Identity Provider configuration page, within the Single Sign-On Services section by clicking the down arrow icon next to the urn:oasis:names:tc:SAML:2.0:bindings:HTTP-POST string and by copying the value at field Location.
- monokee-idp-single-logout-services is the location of the Single Logout service of the Identity Provider. You can find the correct value on the Identity Provider configuration page, within the Single logout services section by clicking the down arrow icon next to the urn:oasis:names:tc:SAML:2.0:bindings:HTTP-POST string and by copying the value at field Location.
- monokee-idp-signing-certificate is the certificate used by the Identity Provider to sign the responses to be sent to the Service Provider. You can find the correct value on the Identity Provider configuration page, within the Signature section by clicking the down arrow of the card and by copying the value at field Certificate.
You can now set these new values using the command:
Set-MsolDomainAuthentication -DomainName $dom -FederationBrandName $dom -Authentication Federated -PassiveLogOnUri $ssourl -SigningCertificate $cert -IssuerUri $entityid -LogOffUri $slourl -PreferredAuthenticationProtocol SAMLP
At this point you can view the new configuration through the command:
Get-MsolDomainFederationSettings
Create SAML 2.0 Application in Monokee
At this point the only thing missing is to create the saml application on the Monokee side.
The following steps will guide you through the process of setting up the SAML application associated to the Microsoft 365 tenant:
Navigate to your Monokee custom fully qualified domain name (FQDN) or if you haven't set up a custom FQDN, go to Monokee's default page and enter your domain ID. Then, enter your login credentials to access your account.
Open the left sidebar and select Applications from the menu.
This will display a list of applications. To create the application, click the Add button located in the top right corner of the table. Then, select SAML Application and click Add.

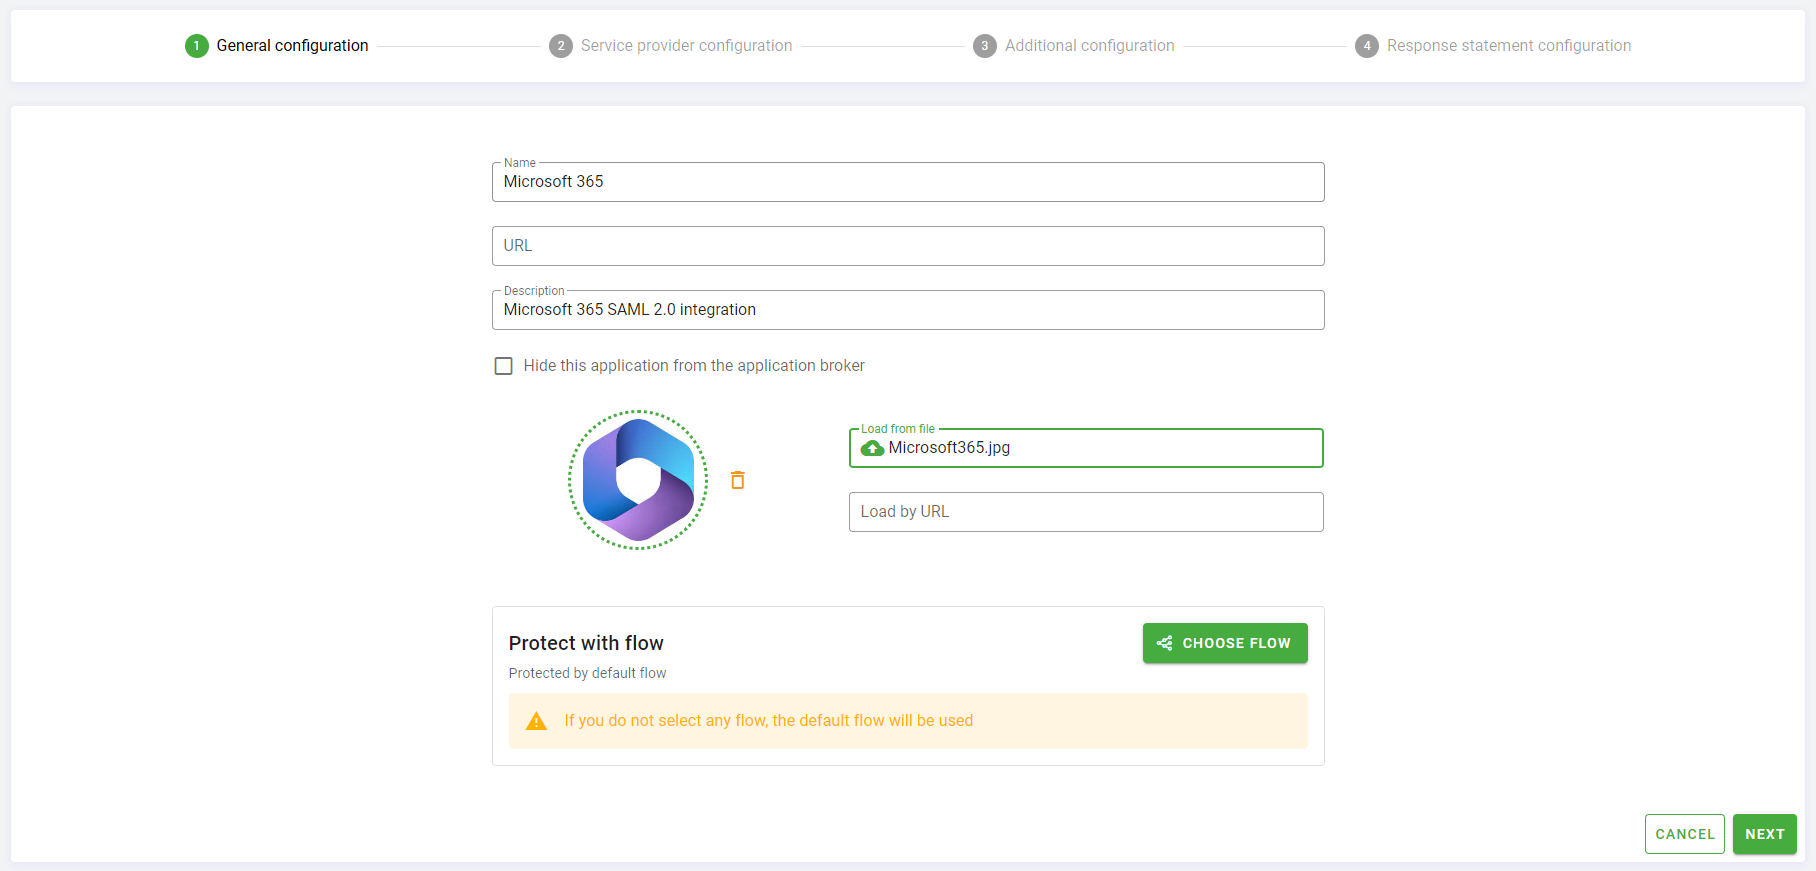
Monokee will open the General Configuration step.
Set the Name of you application. For example Microsoft 365.
Leave the URL parameter empty.
Optionally, set a Description for your application, for example Microsoft 365 SAML 2.0 integration.
Leave the Hide this application from the application broker parameter unchecked, this will allow you to see the application in Monokee Application Broker.
You can load an optional application icon using the Load From File or Load by URL options.
Skip the Protect with flow configuration. In this way the default Authentication Flow will protect this app.
Click Create to proceed to the SAML 2.0 specific configuration. You will be referred to the Service Provider Configuration step.
- In the Service Provider metadata section you can load the Microsoft 365 metadata, you can find it at this Microsoft 365 url. You can load it directly pasting this url in the field Load by URL. This operation will automatically fill all the fields on this step.

Click Next to proceed to the Additional Configuration step.
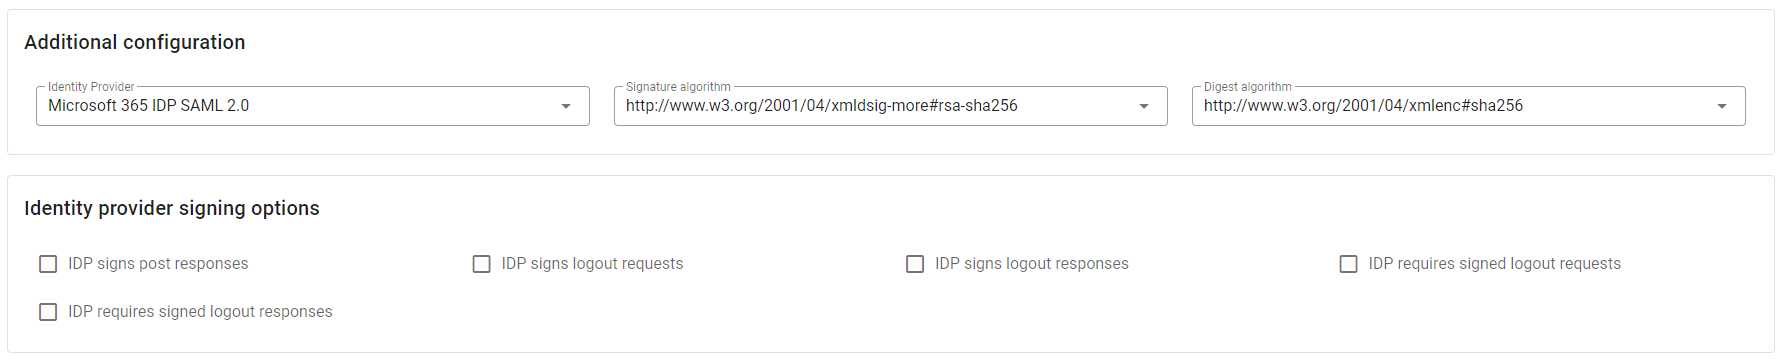
In the Additional Configuration section, in the Identity Provider select choose the identity provider created before Microsoft 365 IDP SAML 2.0, in Signature algorithm choose the value
http://www.w3.org/2001/04/xmldsig-more#rsa-sha256and in Digest algorithm the valuehttp://www.w3.org/2001/04/xmlenc#sha256.All the fields in Identity provider signing options must be kept unchecked.
Click Next to proceed to the last step Response Statement Configuration.
In the Authentication statement options select
urn:oasis:names:tc:SAML:2.0:nameid-format:persistentas Subject format andurn:oasis:names:tc:SAML:2.0:cm:beareras Subject confirmation method.

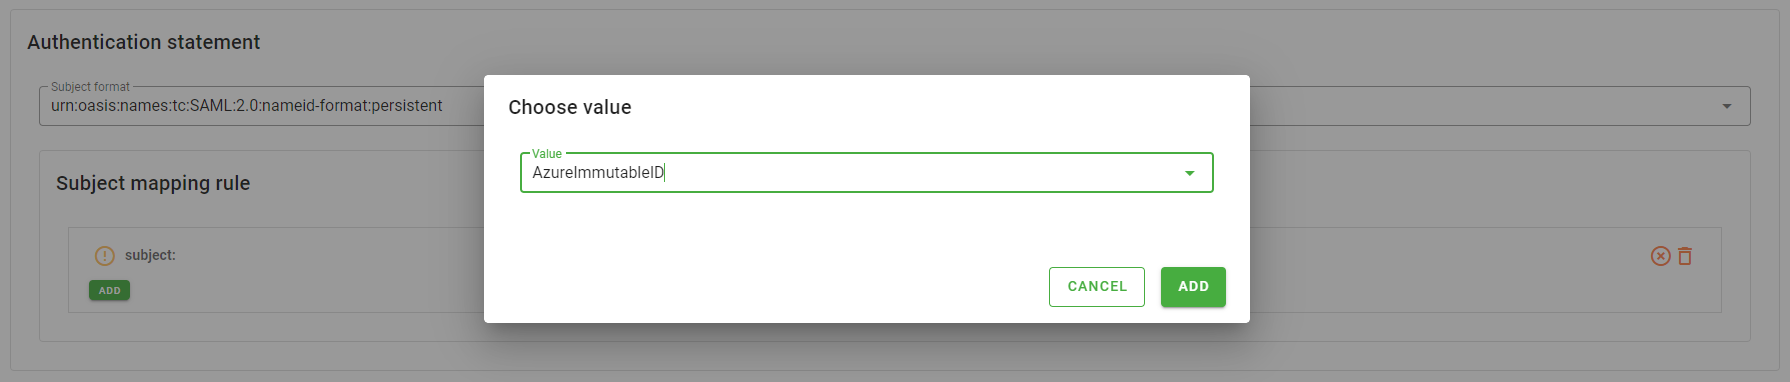
- In the Subject mapping rule you must specify the attribute to be mapped with the subject. To do so, follow the steps:
- Click the pencil icon next to subject label
- Click the Add button, a dialog will appear
- In the Value select present in the dialog choose the attribute AzureImmutableID
- Click the Add button in the dialog
- In the Attribute statement section, you must specify the IDPEmail attribute that Microsoft 365 uses to identify user. In order to achieve this, follow the steps:
- Click New rule and insert
IDPEmail - Click Add
- Choose AzureIDPEmail from available items
- Click Add
- Click New rule and insert

- Click the bottom right corner Create button to save the configuration.
You can now associate the newly created application with the users and groups for which you need to grant access to the application.
Test the correct functioning of the configuration
To test that the configurations you have made are working properly, you can value the AzureImmutableID and AzureIDPEmail attributes for your user and associate the application with him.
The test can be taken for IDP initiated and SP initiated access.
Regarding IDP initiated access, navigate to application broker, a card related to the newly created Microsoft 365 application should have appeared. Click on it to test that the configuration is working properly.
Upon clicking it, a new browser tab will be opened where you will run the application protection flow and then you will be rendered to Microsoft 365.
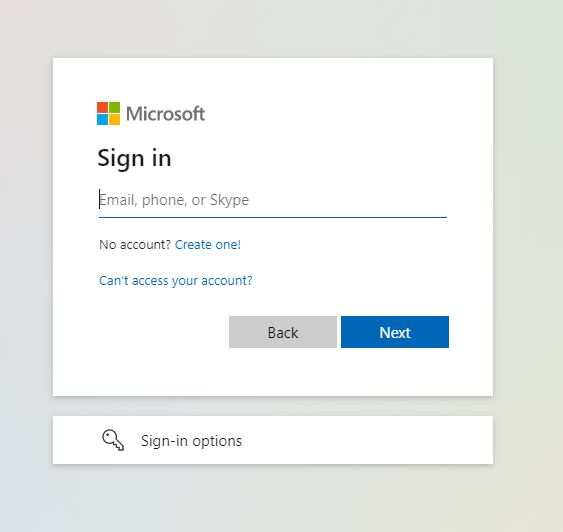
To test the SP initiated flow, you can navigate directly to the Microsoft 365 login page, after entering your email, you will be redirected to the Monokee login flow. A as in the previous case, upon login, you will access to Microsoft 365 with your user.
In both cases, if all the configurations have been done correctly, you will log in to your Microsoft 365 restricted area.