
Accessing Salesforce through the OpenID Connect protocol
One of the most widely used protocols for implementing federated access is the OpenID Connect protocol. As with SAML, OpenID Connect allows access to an application (Relying Party - RP) by delegating authentication to an external provider (OpenID Provider - OP).
Monokee implements all the dictates of an OpenID Provider, in this regard it has also acquired full certification as OpenID Provider, as can be seen from the official website of the OpenID Fundation at this link.
The following article discusses how to integrate Salesforce and Monokee using the OpenID Connect protocol. Salesforce will play the part of the Relying Party while Monokee will play the part of the OpenID Provider.
From a user experience point of view, a user trying to access a Salesforce custom domain will be redirected to Monokee, which will authenticate him or her and pass to Salesforce the information needed for proper user identification on its side.
How to Configure Monokee as an OpenID Provider
In order to properly configure an OpenID Provider on your Monokee domain, you must comply with the following steps:
- A Create a custom attribute to save the user's email identifier in Salesforce
- B Set up an OpenID Provider that has the necessary configurations to properly communicate with Salesforce in the Relying Party role
- C Add an OpenID application where you can save the Relying Party parameters exposed by Salesforce
A) Attribute containing the user's email on Salesforce
Using the OpenID Connect protocol, by default on Salesforce the user is identified by the email address that he or she uses to log into the custom domain.
It is therefore necessary that all Monokee users for whom you want to enable access to Salesforce using the OpenID Connect protocol, have an attribute valued with the email address they use to log into Salesforce.
It is assumed that an attribute called SalesforceEmail exists for this purpose. Creating and valorizing this field for domain users is outside the scope of this article.
B) OpenID Provider configuration
After having an attribute in which to save the users' email address, we need to create the OpenID Provider to associate with the Monokee domain. To do this, please use the following guidelines.
Navigate to your Monokee custom fully qualified domain name (FQDN) or if you haven't set up a custom FQDN, go to Monokee's default page and enter your domain ID. Then, enter your login credentials to access your account.
Open the left sidebar and select OpenID Providers from the menu.
The page containing any other configurations related to OpenID Providers already registered on the domain will be shown. Click the Add button located in the top right corner to add a new one.
Within the presented modal, in the Core section, enter the desired Name for your new provider, such as Salesforce OpenID Provider. Leave the settings Issuer and JWKS uri unchanged. Then set authorization_code as the value for the field Grant types supported and client_secret_post for the fields Token endpoint authentication methods supported, Revoke endpoint authentication methods supported and Introspect endpoint authentication methods supported.
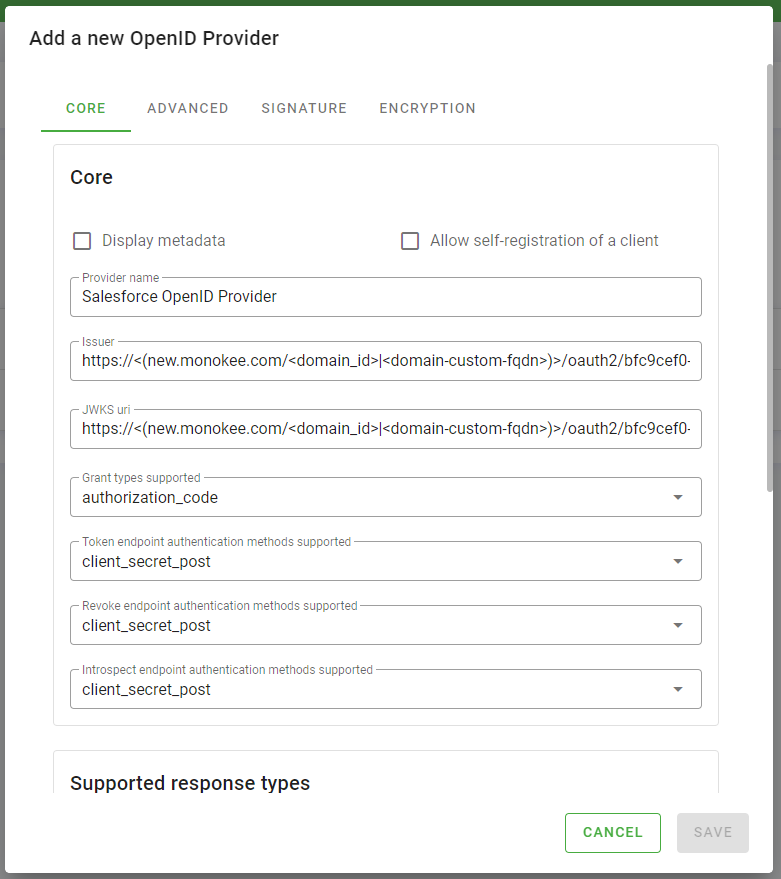
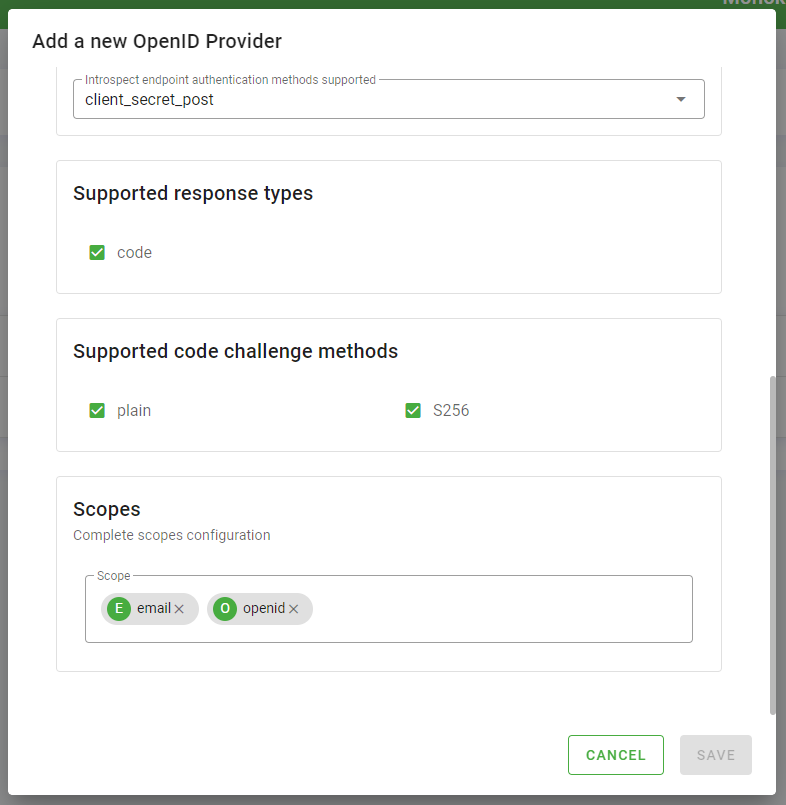
- In the sections below the core configuration, enable the value code for Supported response types and plain and S256 for Supported code challenge methods. In the section about Scopes, add the values email and openid.
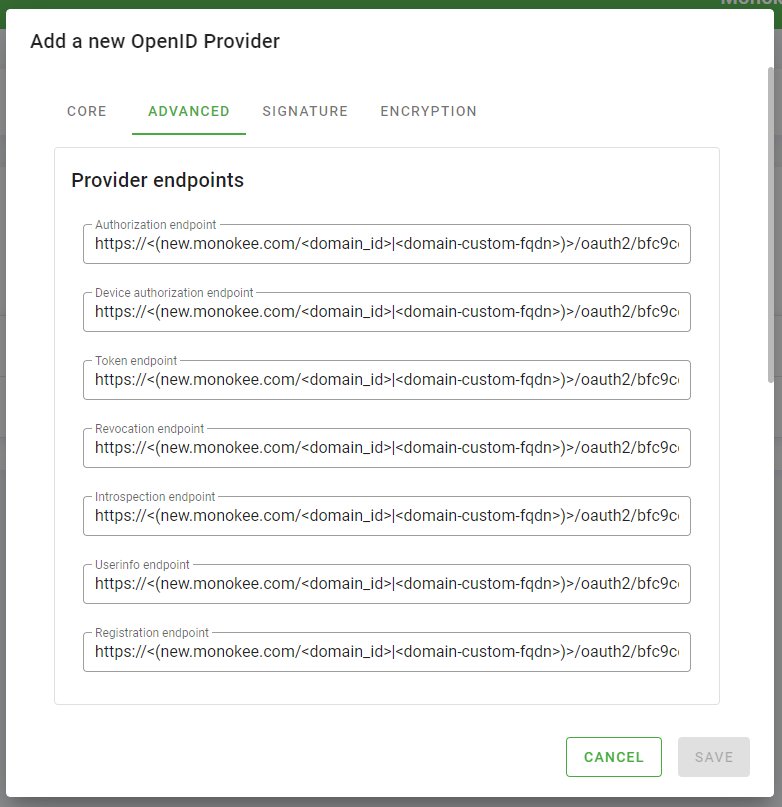
- Change tab now and go to the Advanced one. Leave all urls in the Provider endpoints section with the proposed default values.
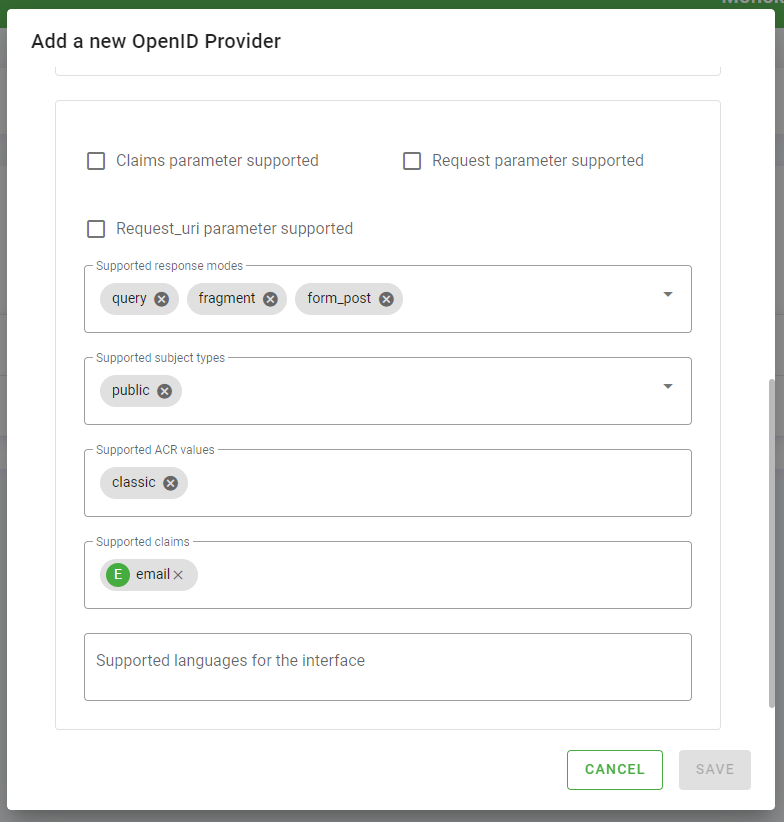
- Further down, fill out the form as follows:
- leave the Claims parameter supported, Request parameter supported and Request_uri parameter supported checks blank
- set the values query, fragment and form_post for the Supported response modes field
- set the value public for the Supported subject types field
- set the value classic for the Supported ACR values field
- set the value email for the Supported claims field
- leave Supported languages for the interface field blank
- Now go to the "Signature" tab and do the following:
- choose the value RS256 for the Signature algorithms for the token ID supported field
- choose the value none for the Signing algorithms for the userinfo object supported field
- choose the value none for the Signing algorithms for the request supported field
- click the Add button located inside the Signature card. A dialog will open in which you can generate a public and private key pair.
- choose from the Select an algorithm for signing select the RS256 algorithm
- click the Generate Key Pair button, keys will appear in the form
- click Add in the lower left corner to close the modal related to adding the key pair

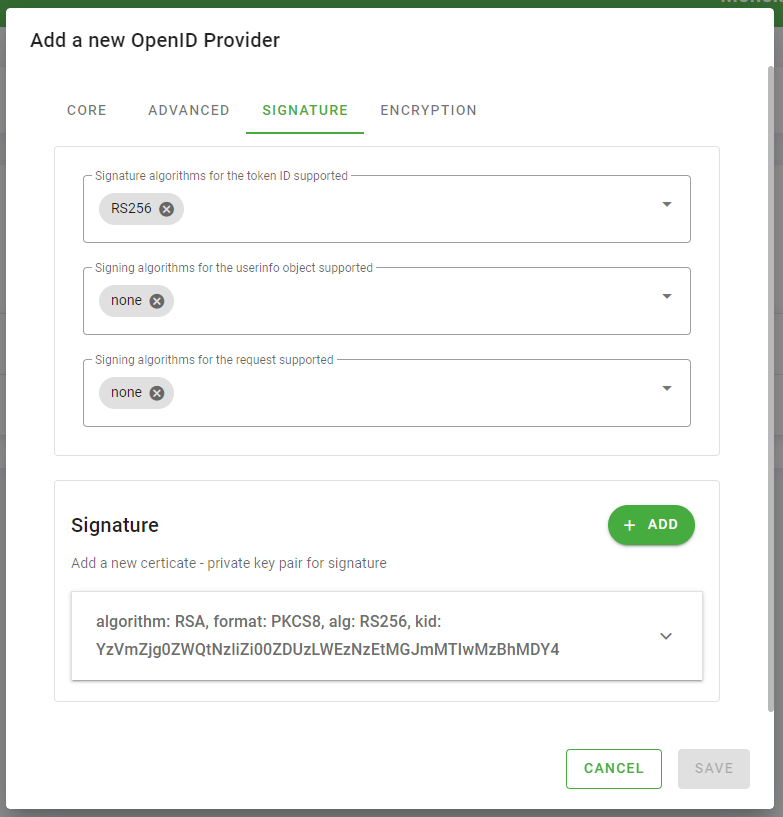
- Finally, leave all the configurations in the Encryption tab blank and click the Add button to create the OpenID Connect Provider associated with your custom Monokee domain.

Salesforce configurations
Before proceeding with the creation of the OpenID Connect application, let's do the configuration on the Salesforce side. After this is completed, in fact, the redirect uri, a mandatory value for creating the OpenID Connect application on the Monokee side, will be released by Salesforce.
The following will detail the procedure to be performed on Salesforce to create the Relying Party OpenID Connect that can be integrated with Monokee for single sign-on access.
- As a first step, access your Salesforce domain from the Current my Domain Url, which generally has the format
https://<my-domain-name>.my.salesforce.com/. You must use a user with an administrative role.
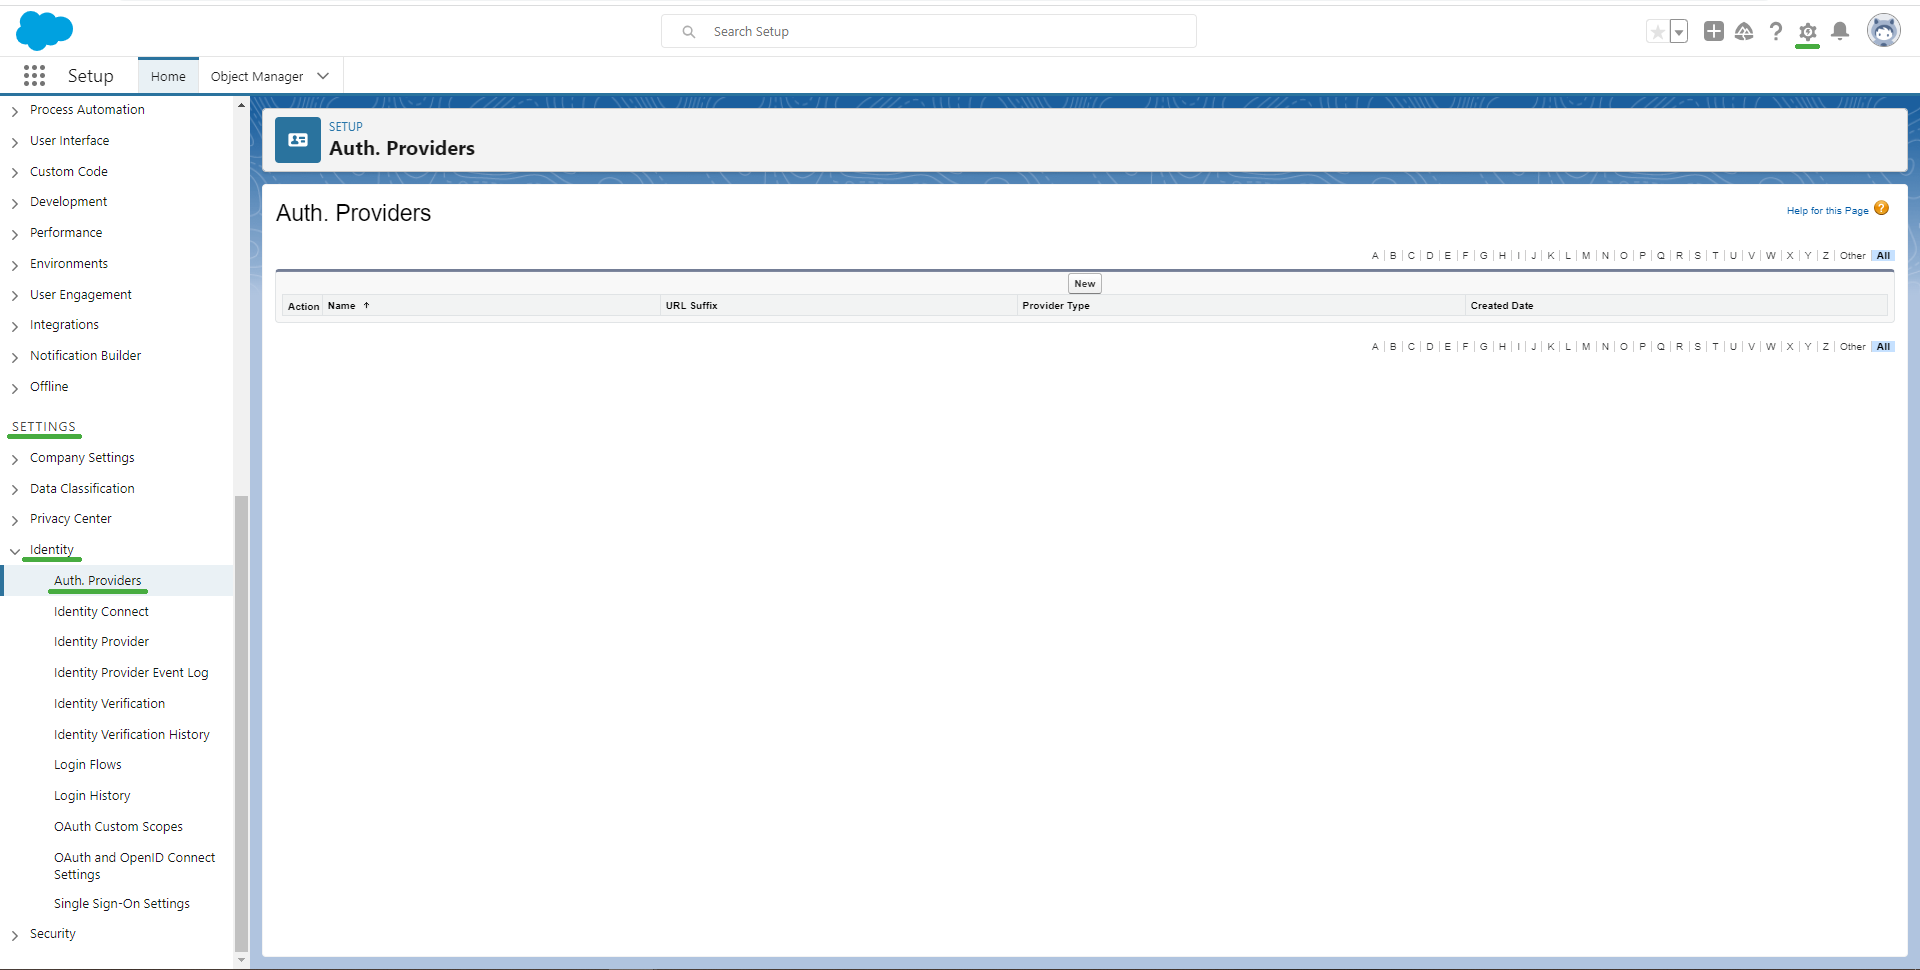
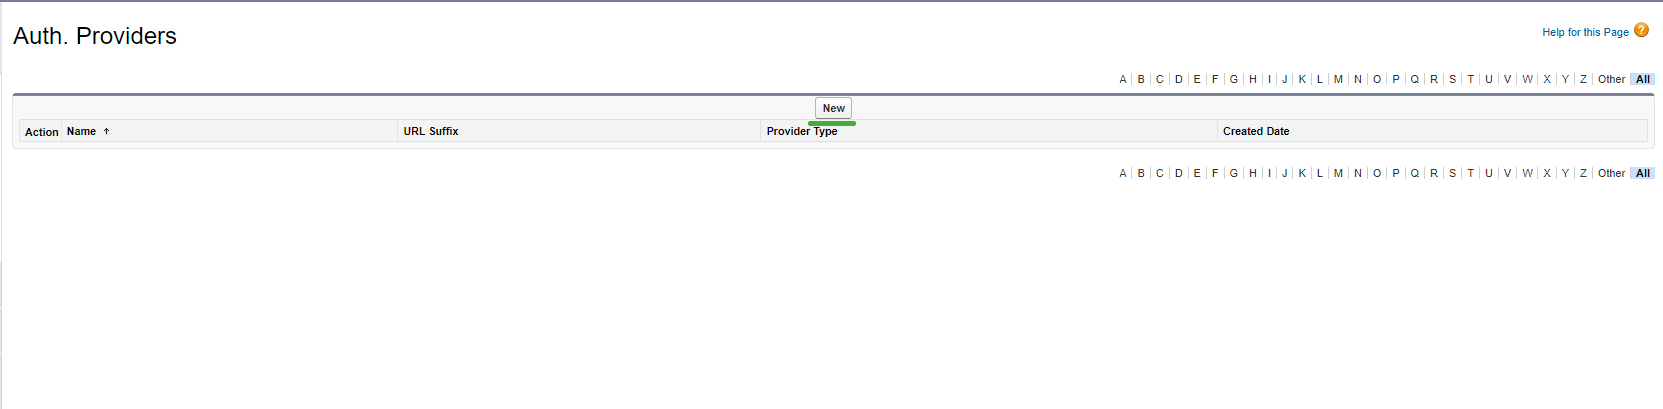
- After logging in, navigate to the section of Auth. Providers, which is available at the path Settings > Identity > Auth. Providers.
2a. In the case that you are using version "Salesforce Classic" instead of "Lightning Experience", you can find this option at the path Administer > Security Controls > Auth. Providers after clicking the Setup button present on the top right of the page.
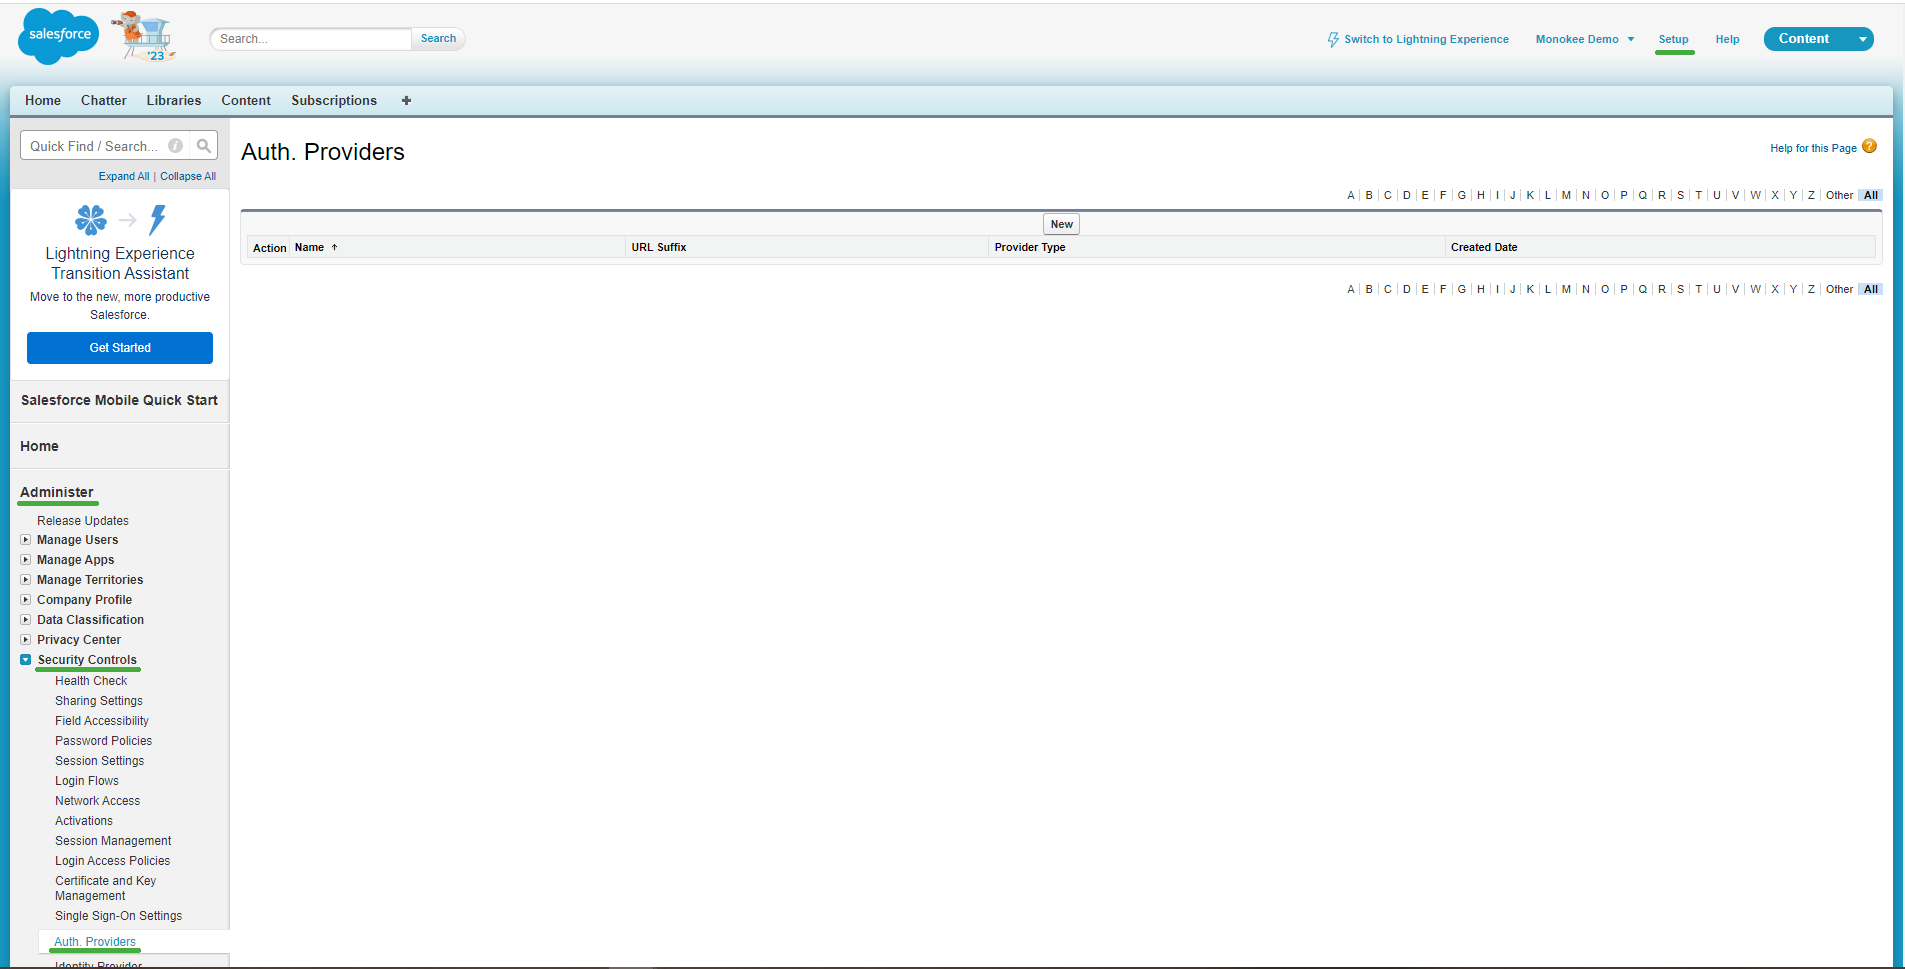
- From this screen you can create the configuration for the Relying Party OpenID. First, click the "New" button found in the center of the page, this will trigger a redirect to a form where you can enter all the details of the configuration.
- Instructions for properly configuring the Relying Party follow:
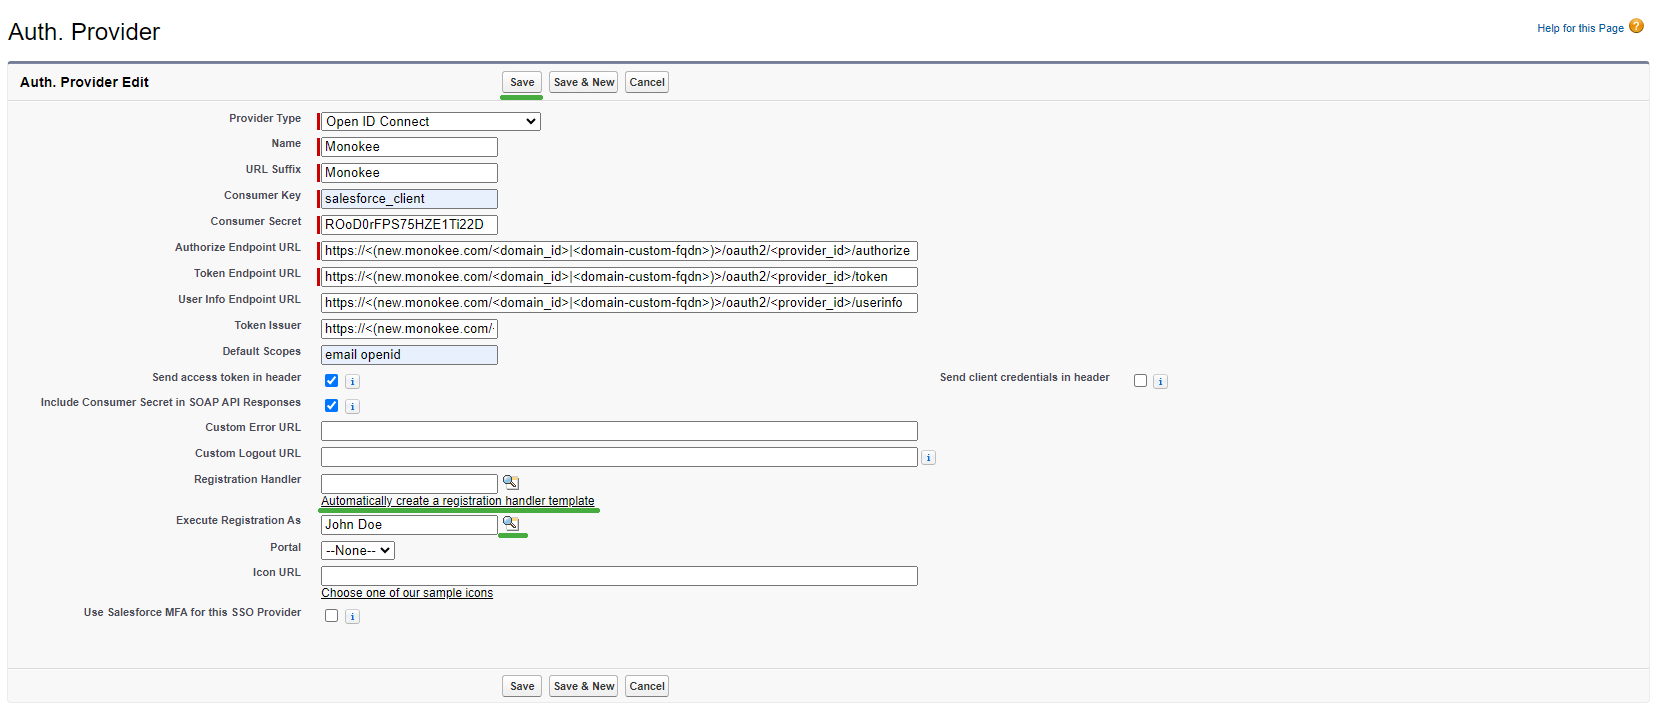
- In the Provider Type select, choose the value Open ID Connect
- In the Name field, enter the value you want to assign to the configuration, for example, Monokee
- When the Name field is saved, the URL Suffix field will be automatically valued. Leave the suggested value.
- The Consumer Key field must contain the
client_idvalue, which is the value that allows the OpenID Provider to identify the Relying Party. This value should then be returned to the configuration of the OpenID application on Monokee. In this example we use the value salesforce_client - The Consumer Secret field is the field where to save the
client_secretof the Relying Party. This value will also then need to be returned to the configuration of the OpenID Connect application on Monokee. In this example, a random value of ROoD0rFPS75HZE1Ti22D is used. - The values for the Authorize Endpoint URL, Token Endpoint URL and User Info Endpoint URL fields can be retrieved from the OpenID Provider configuration done on Monokee earlier. After logging in to your Monokee domain, from the left sidebar, select OpenID Providers and click on the provider created before. The fields can be retrieved from the Advanced section from the Authorization endpoint, Token endpoint and Userinfo endpoint fields, respectively.
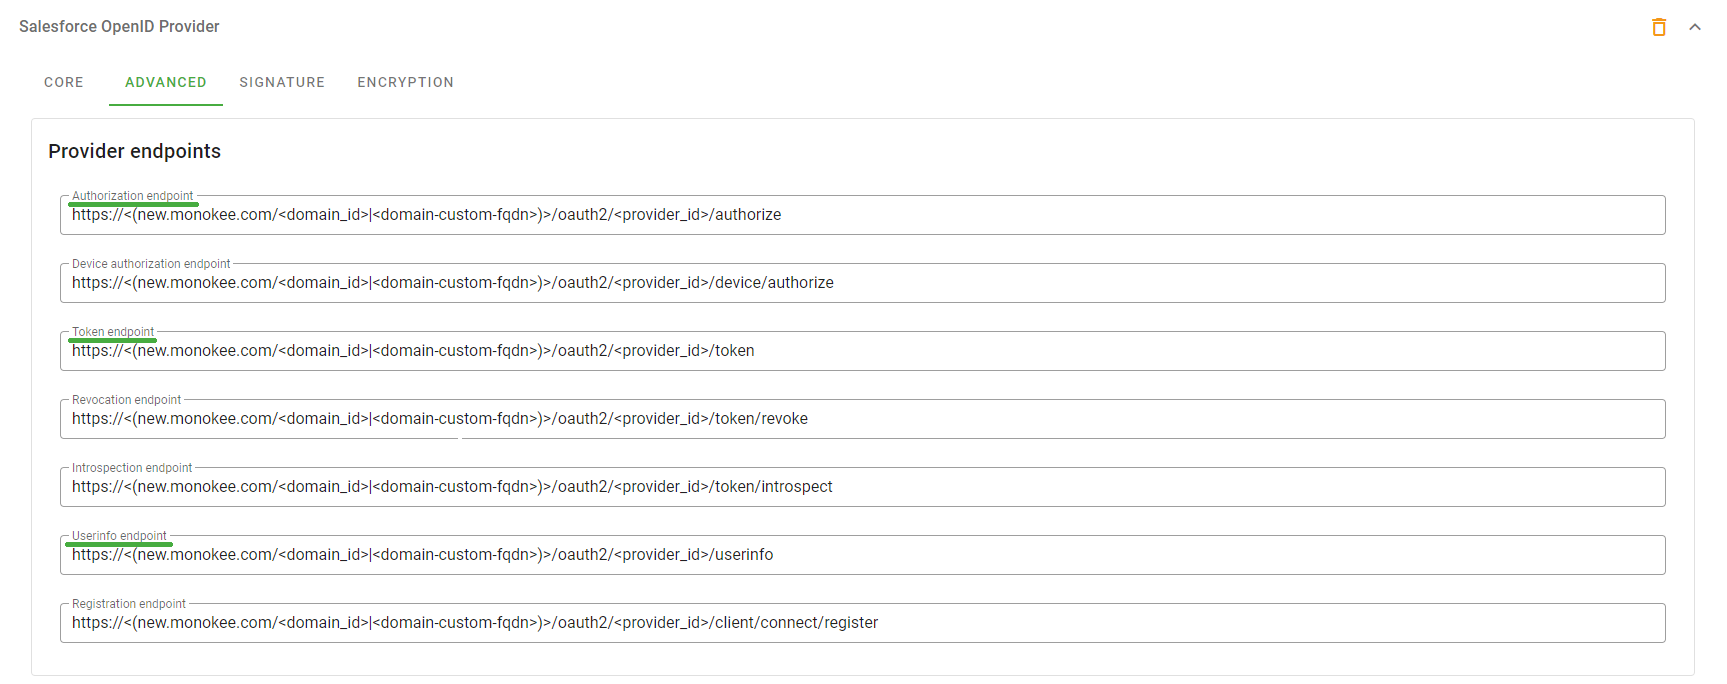
Figure 11 - OpendID Connect Provider Advanced Urls - The value for the Token Issuer field instead can be retrieved from the Core section of the OpenID Provider in Monokee to the Issuer field
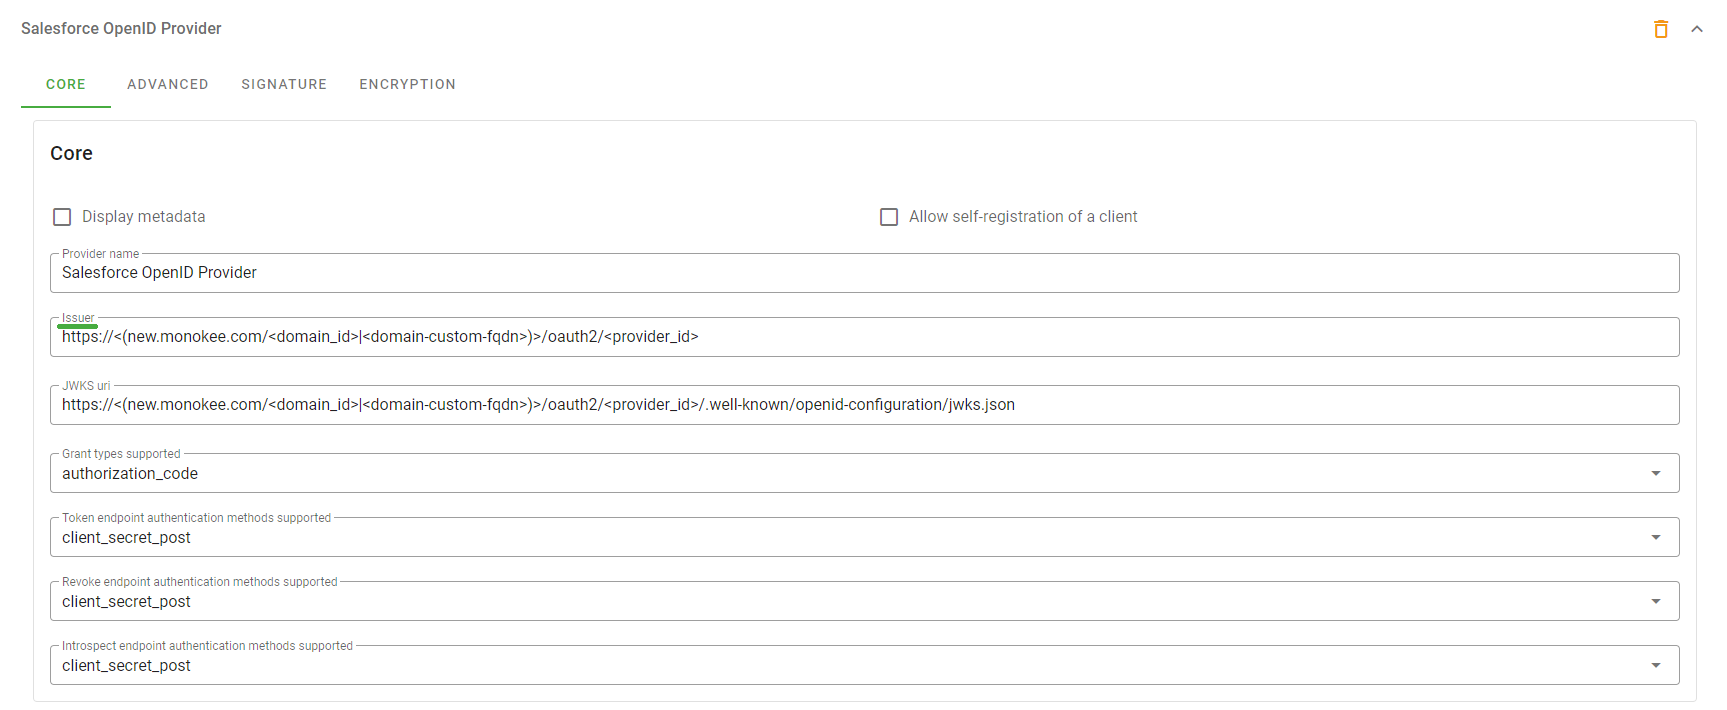
Figure 12 - OpendID Connect Provider Issuer Url - As Default Scopes set the value email openid
- Leave the Send access token in header, Send client credentials in header and Include Consumer Secret in SOAP API Responses checks with the default values
- Leave fields Custom Error URL and Custom Logout URL blank
- For the Registration Handler field, you can use a default registration handler. To generate one of them, simply click the Automatically create a registration handler template link
- As Execute Registration As choose a user who has the necessary permissions to create users, you can do this by clicking on the button with the magnifying glass beside the field and choosing from the proposed profiles
- You can leave the next Portal, Icon URL and Use Salesforce MFA for this SSO Provider fields with the default values
- Finally, click the Save button to save the configuration
- Once the configuration is saved, you will be sent back to the configuration detail. The bottom section on Salesforce Configuration will list the urls exposed by Salesforce for integration via OpenID Connect protocol. Of these, let's retrieve the Callback URL value that will later be useful for creating the OpenID Connect application on the Monokee side.
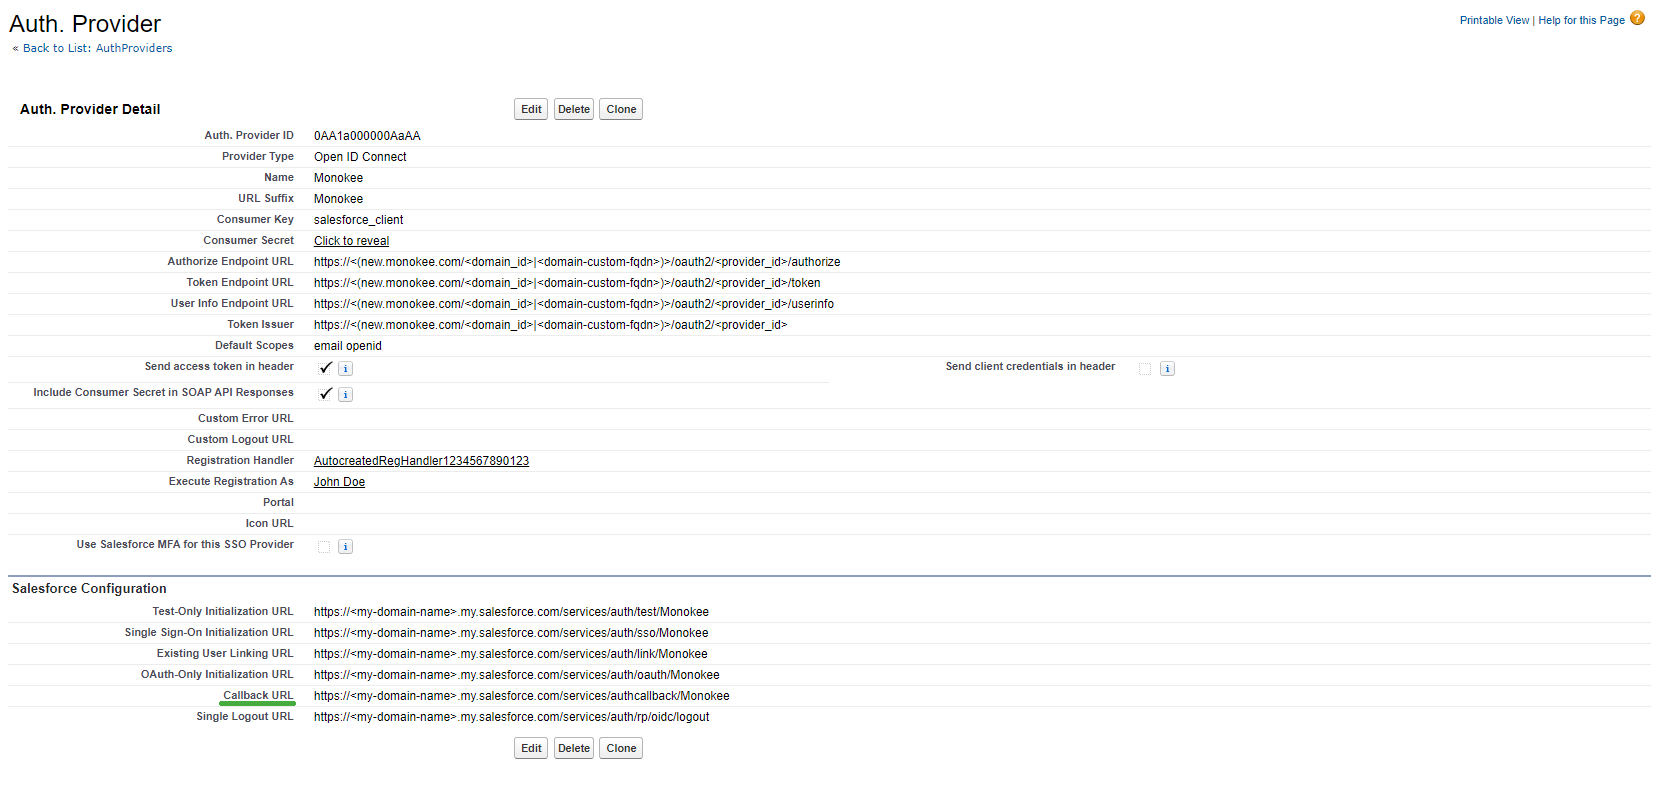
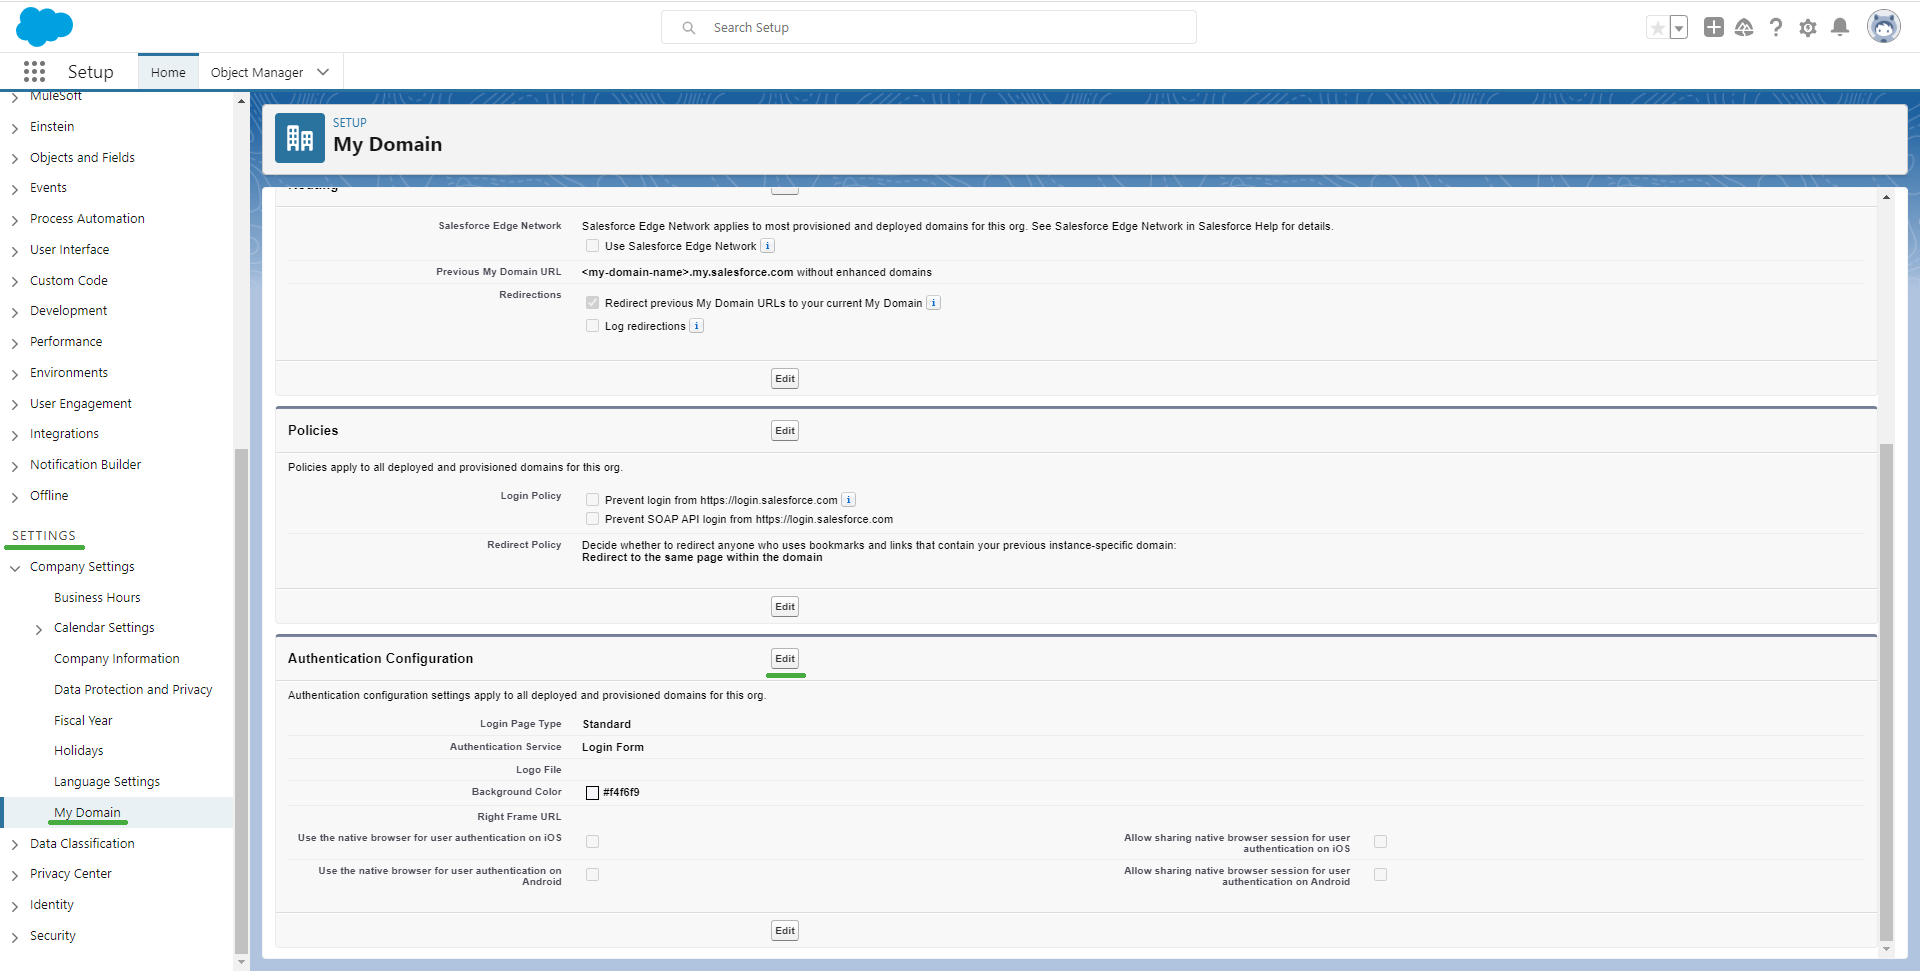
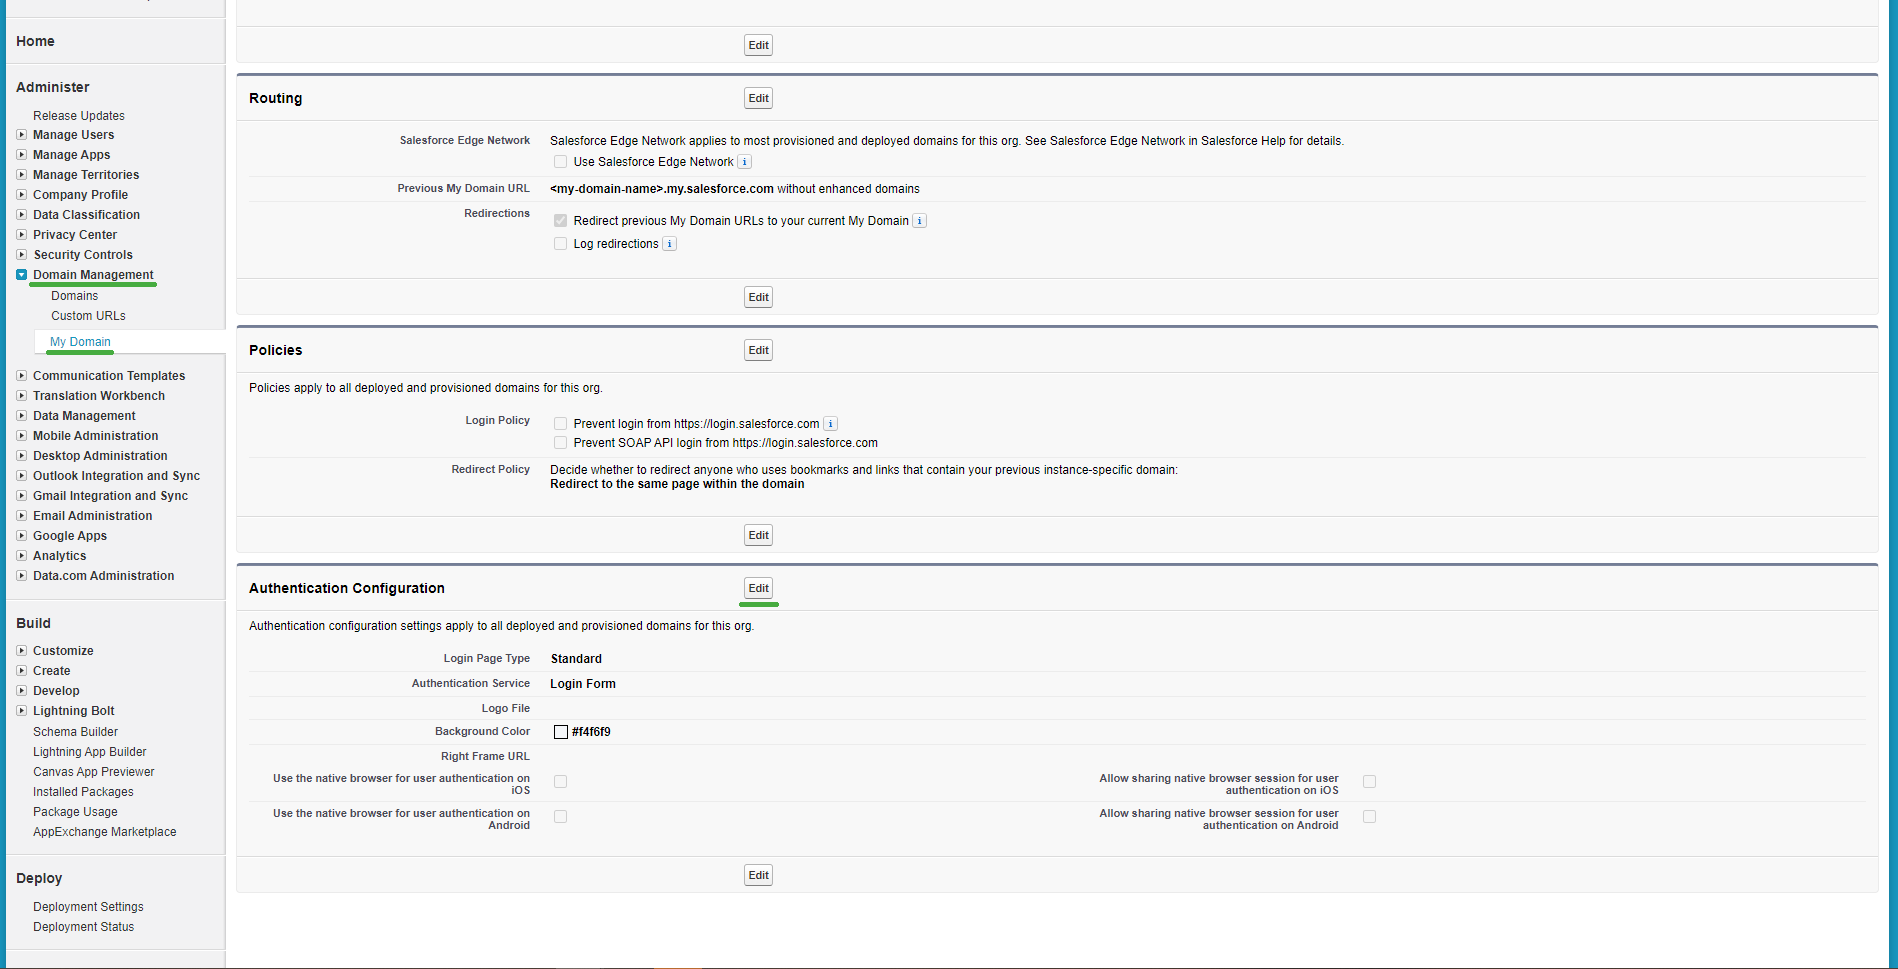
- The last action to take on Salesforce is to enable login to the custom domain using the OpenID Provider associated with Monokee. To do this you need to navigate to Authentication Configuration menu area located at the Settings > My Domain > Authentication Configuration path if using the "Lightning Experience" version while at the Domain Management > My Domain > Authentication Configuration path if using the "Salesforce Classic" version. Here you need to click the Edit button, which in both cases will open a new page.
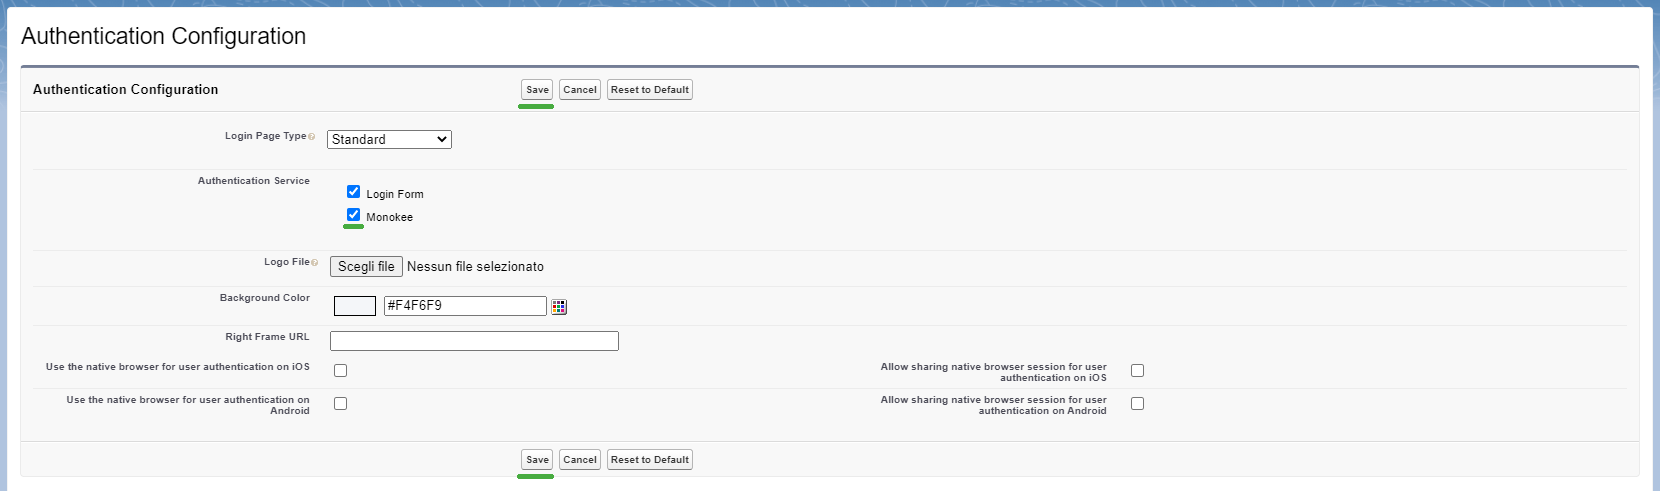
In the opened page Authentication Configuration the available Authentication Services will be displayed. Click the check for the newly added configuration Monokee and then the Save button.
We can now proceed with the last step to be performed on the Monokee side, which is the creation of the OpenID Connect application in which the Relying Party information exposed by Salesforce will be saved.
C) Create OpenID Connect application on Monokee
Before the OpenID Connect protocol federation can be used to log onto Salesforce, the Monokee-side OpenID Connect application must be created in which to save Salesforce configurations. To do this, follow the steps outlined here:
Navigate to your Monokee custom fully qualified domain name (FQDN) or if you haven't set up a custom FQDN, go to Monokee's default page and enter your domain ID. Then, enter your login credentials to access your account.
Open the left sidebar and select Applications from the menu.
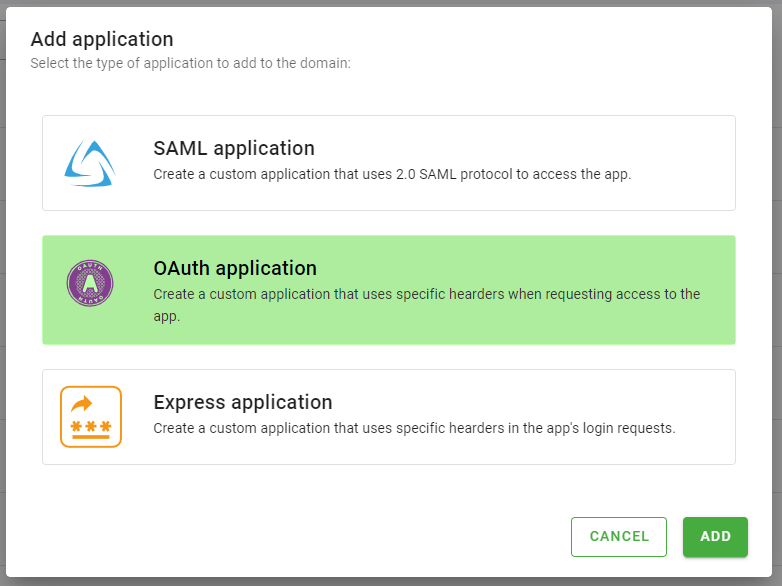
From this page, click the Add button in the upper right corner to create the new application. A modal will open showing the possible types of applications you can add, choose OAuth Application and click Add.
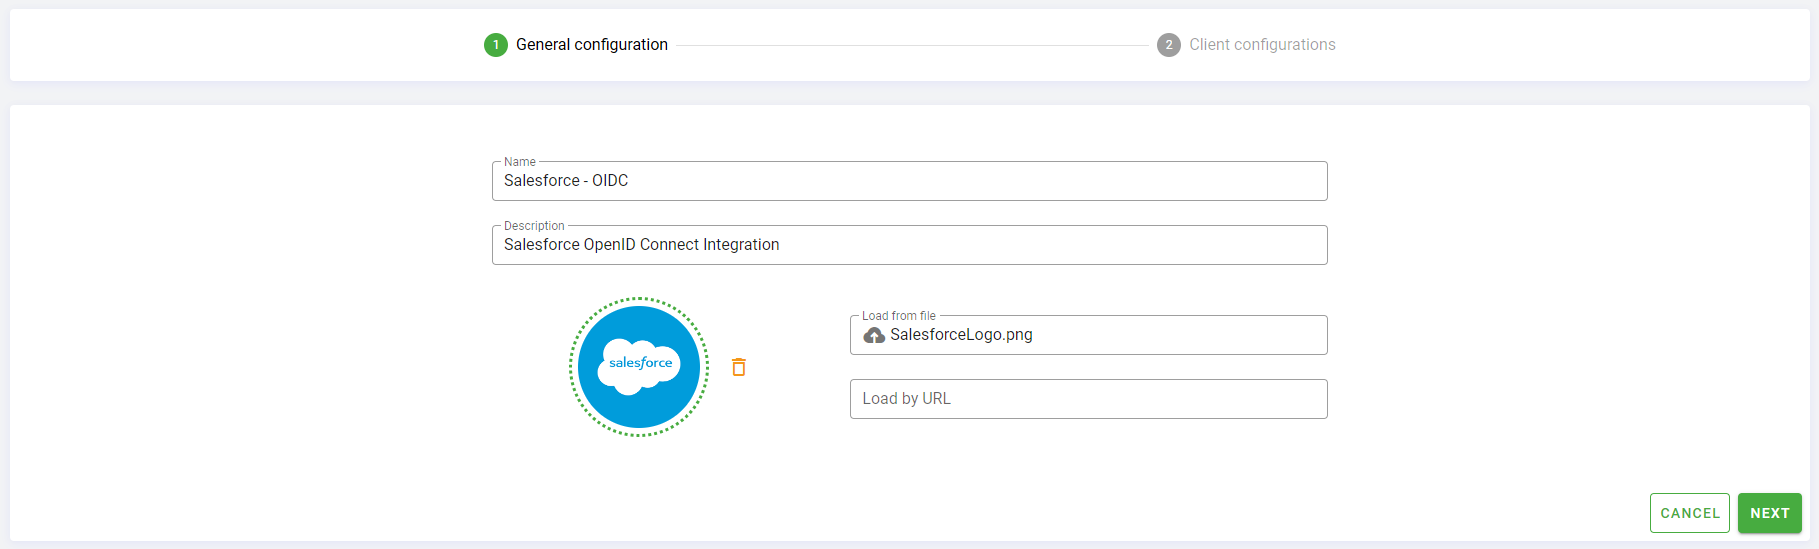
- The New Application page will be displayed at the General Configuration section. In this section:
- Set the Name for the new application, for example Salesforce - OIDC.
- Optionally, set a Description, in this case we use Salesforce OpenID Connect Integration.
- Optionally, load an image for your application, it will be displayed in the Application broker. You can do so using the Load From File or Load by URL options.
- Then click the Next button.
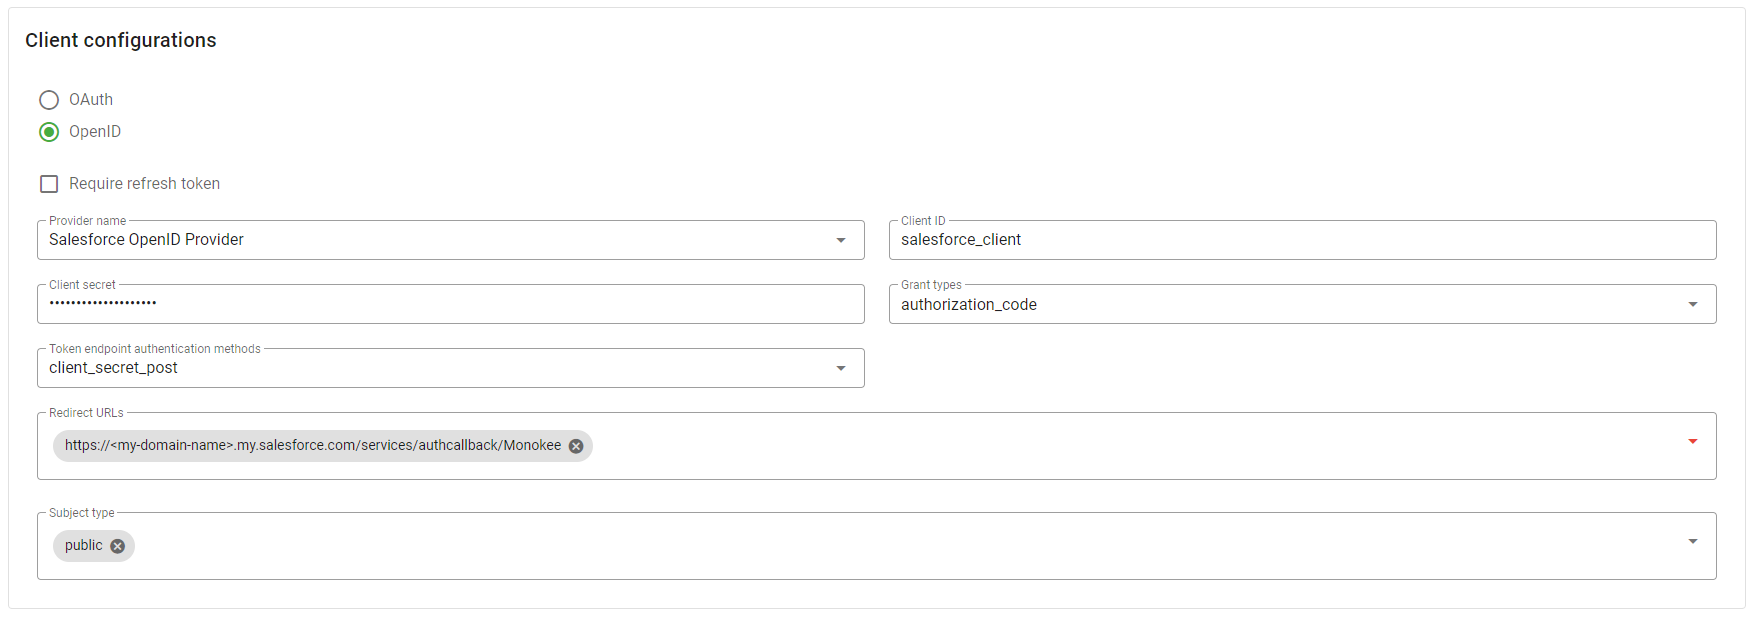
- Upon clicking the Next button, you go to the Client Configurations tab. In the first section Client Configurations you need to do the following:
- Choose the option OpenID
- Leave the field Require refresh token blank
- In the select Provider name choose the provider created previously, in this example Salesforce OpenID Provider.
- The Client ID field must contain the client id specified on Salesforce on the Consumer Key field, in this case salesforce_client
- The Client Secret field should carry the same value set on Salesforce to Consumer secret, i.e. ROoD0rFPS75HZE1Ti22D
- As Grant Types choose authorization_code
- In Token endpoint authentication methods field set client_secret_post value
- The Redirect URLS field needs to be set to the value retrieved from Salesforce, in this case
https://<my-domain-name>.my.salesforce.com/services/authcallback/Monokee - In Subject Type field set public as value.
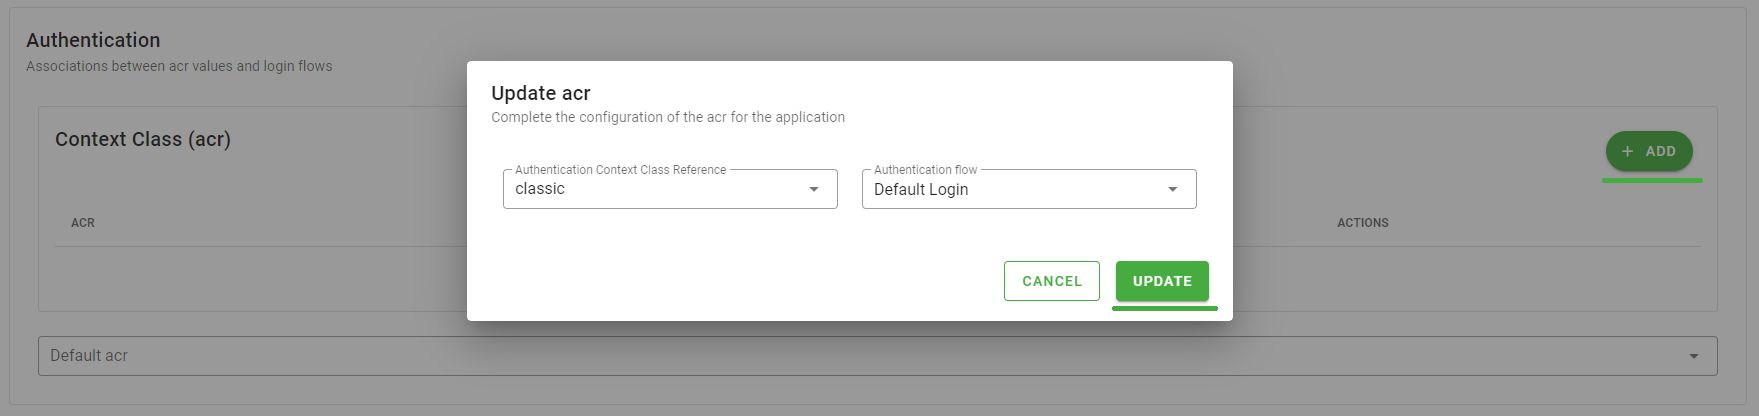
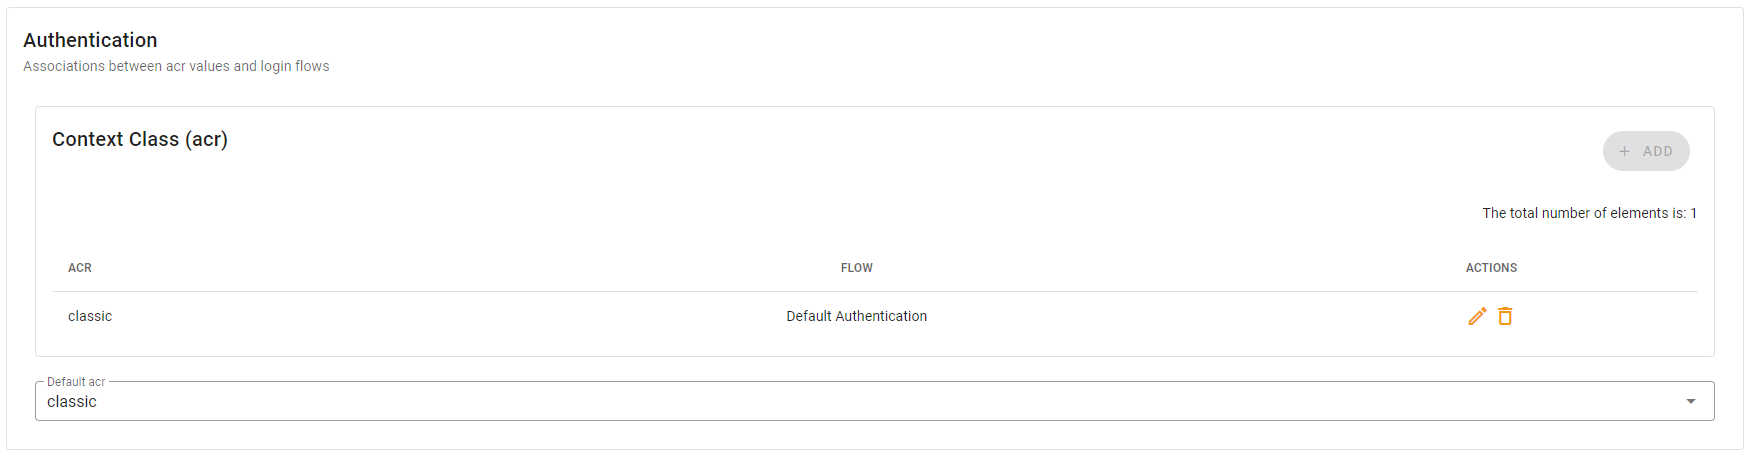
- The next section is on Authentication. Here you do the following:
- Click the Add button in the upper right-hand corner
- A dialog is opened, on the first entry Authentication Context Class Reference select classic, on the second Authentication flow choose the flow with which you want to protect access to the application, in this case Default Login
- Click the button Update to confirm your choice, it will close the dialog
- Finally, choose classic as Default acr
- Regarding the configuration related to Consent, enable the option Skip the consent screen

- In the Response Types section, enable the code option

- Leave the default values for all Duration token/code (seconds) card options

- In the Scopes card, set on the Scope field the values openid, email, and offline_access and on the Default Scopes field the values openid and email

- Regarding the configuration related to JWT configuration do the following:
- in field Signature Algorithm for IDToken choose the value RS256. Three more entries will appear, leave fields Encryption Algorithm for IDToken and Content Encryption Algorithm for IDToken empty, and choose the only value available for field Signature Key IDToken
- in field Signature Algorithm for Userinfo select the value none and do not edit the two values Encryption Algorithm for Userinfo and Content Encryption Algorithm for Userinfo that will have appeared
- in field Request Signing Algorithm select the value none and leave empty the fields Request Encryption Algorithm and Request Content Encryption Algorithm that have appeared

Now click the Next button at the bottom left to proceed with the Claims Mapping configurations.
In the Claims mapping card, choose the value email for the fields Scopes used in claims mapping and Claims used in scopes mapping and the value SalesforceEmail for the field Attributes available for mapping.
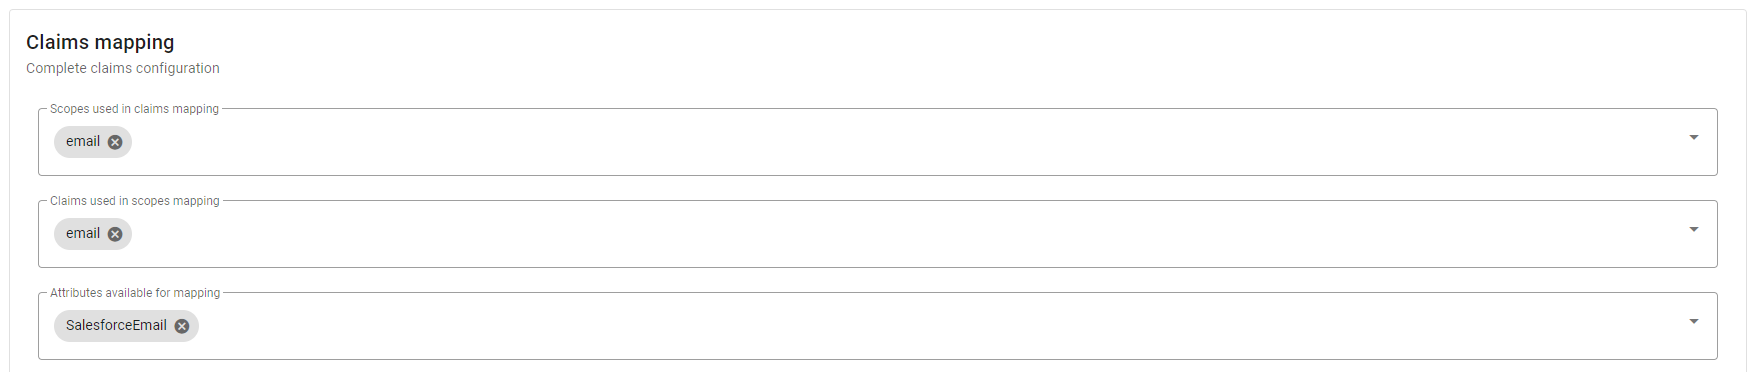
Valuing the fields in the previous step will cause additional fields to appear, value them as follows.
In the Attribute mapping rule section, perform these steps:
- click the New Rule button.

Figure 28 - Monokee Attribute Mapping first step - the New mapping rule modal will be opened, here indicate email in the Value field.
- click the Add button.

Figure 29 - Monokee Attribute Mapping second step - the Choose value modal will be opened, here choose the value SalesforceEmail for the Value field
- click Add button again
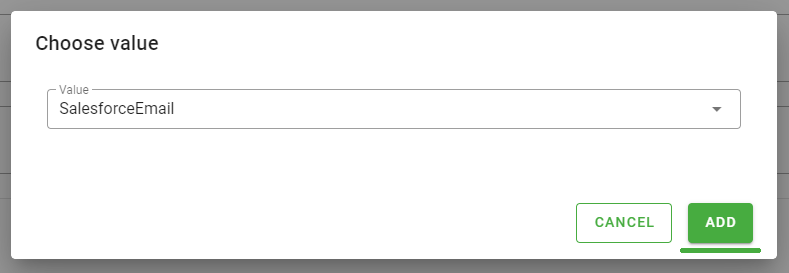
Figure 30 - Monokee Attribute Mapping third step - the modal is closed and a summary of the configuration for the attribute mapping is shown

Figure 31 - Monokee Attribute Mapping result
- click the New Rule button.
In the claim section:
- click the Add button

Figure 32 - Monokee Claim Configuration first step - the Add new claim modal will be opened. Here choose email as the value of both the Scope field and the Associated claim field and click add
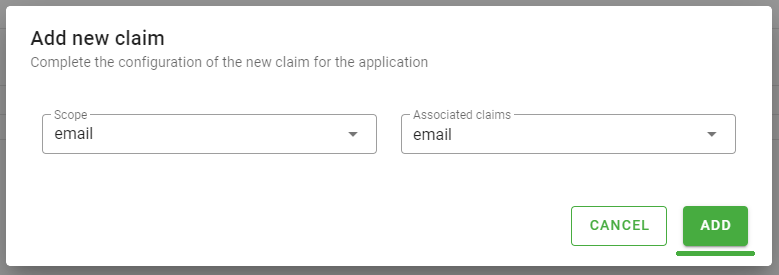
Figure 33 - Monokee Claim Configuration second step - the modal will be closed and a summary of the configuration for the claims will be shown

Figure 34 - Monokee Claim Configuration summary
- click the Add button
In the last section Claim location, enable the claim email for both ID_TOKEN and USERINFO.
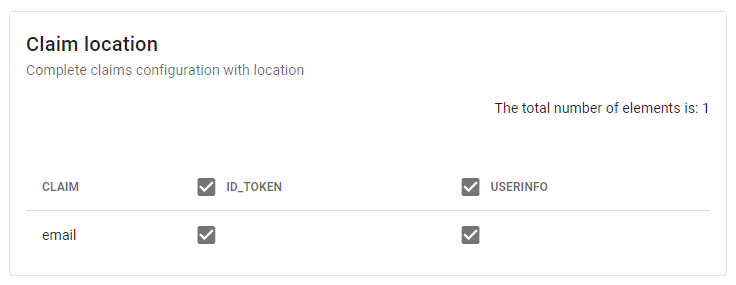
Figure 35 - Monokee Claim Location Configuration Click the bottom right corner Create button to create the application.
The application was created and configured so that proper communication can take place between Monokee and Salesforce according to the requirements of the OpenID Connect protocol. It is now possible to associate the application with users and groups of interest in order to allow them to access Salesforce through Monokee.
How to test access to Salesforce
In order to test access to the application, it is necessary that the application created in the previous paragraph has been assigned to the relevant users or groups and that the users have the custom attribute SalesforceEmail valued with the email address with which they are censored on Salesforce.
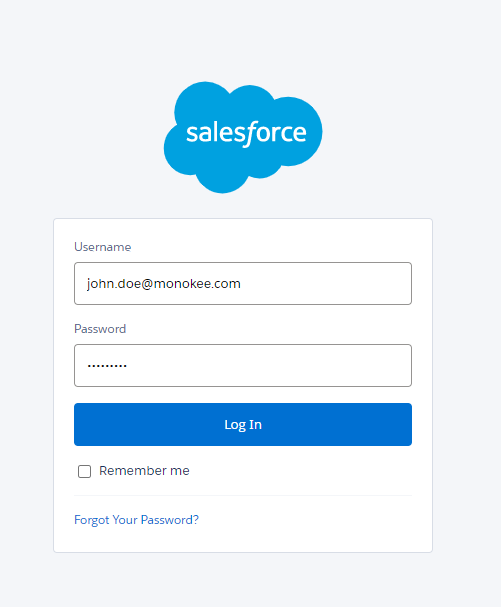
Once these preliminary steps have been taken, access can be tested directly from the Salesforce login page at the url https://<my-domain-name>.my.salesforce.com/.
The page will show the classic login form and the Login with Monokee button.
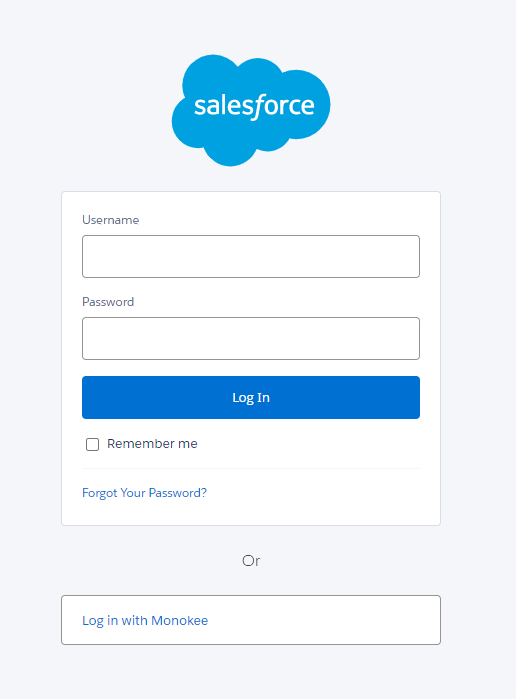
By clicking this button, you will be redirected to the login page of the flow associated with the classic acr, as per the configuration made earlier, and, when the login process is complete, you will be redirected to the Salesforce custom domain home page.
If you want to leave only federated access via Monokee enabled, you will simply go back to the Authentication Configuration page on Salesforce and disable access via Login Form by unchecking the relevant item and clicking Save.
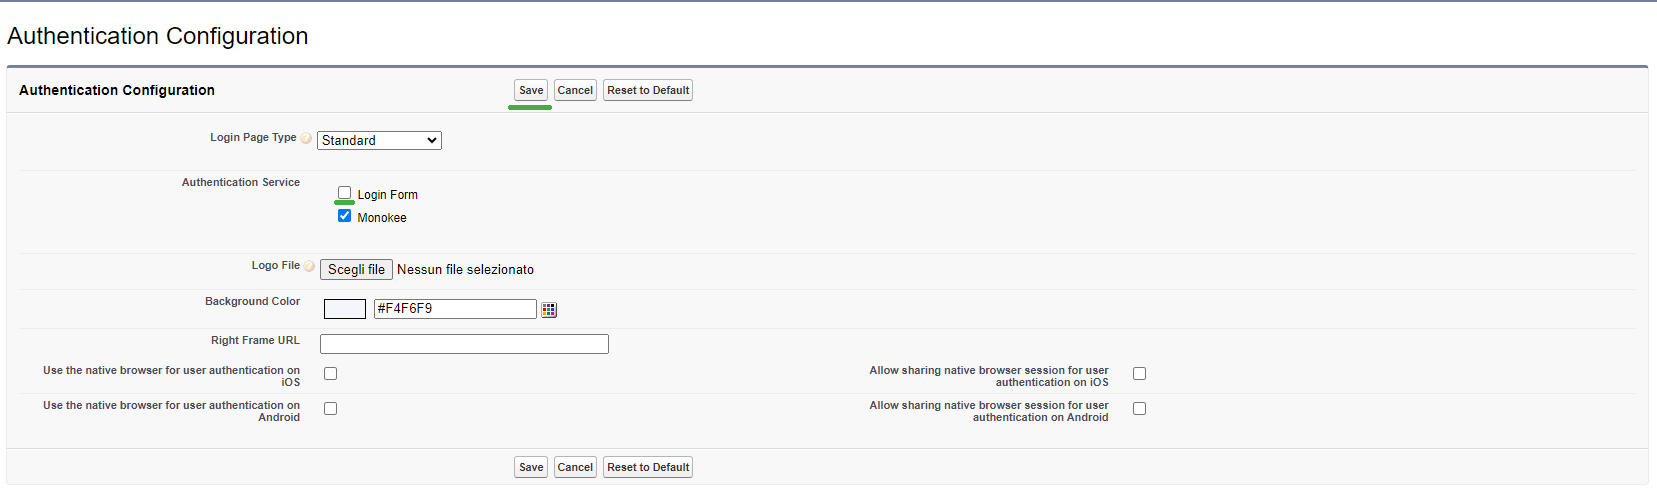
By doing this, the Salesforce custom domain login page will automatically redirect to Monokee for login without showing the classic login form.