
Monokee's partner: Toothpic
Toothpic stands at the forefront of revolutionary authentication technology, introducing a cutting-edge approach that leverages the unique hardware characteristics of smartphones for unclonable identity verification. At its core, Toothpic addresses the escalating challenges of traditional authentication methods and forges a path towards a frictionless, passwordless identity and access management (IAM) framework.
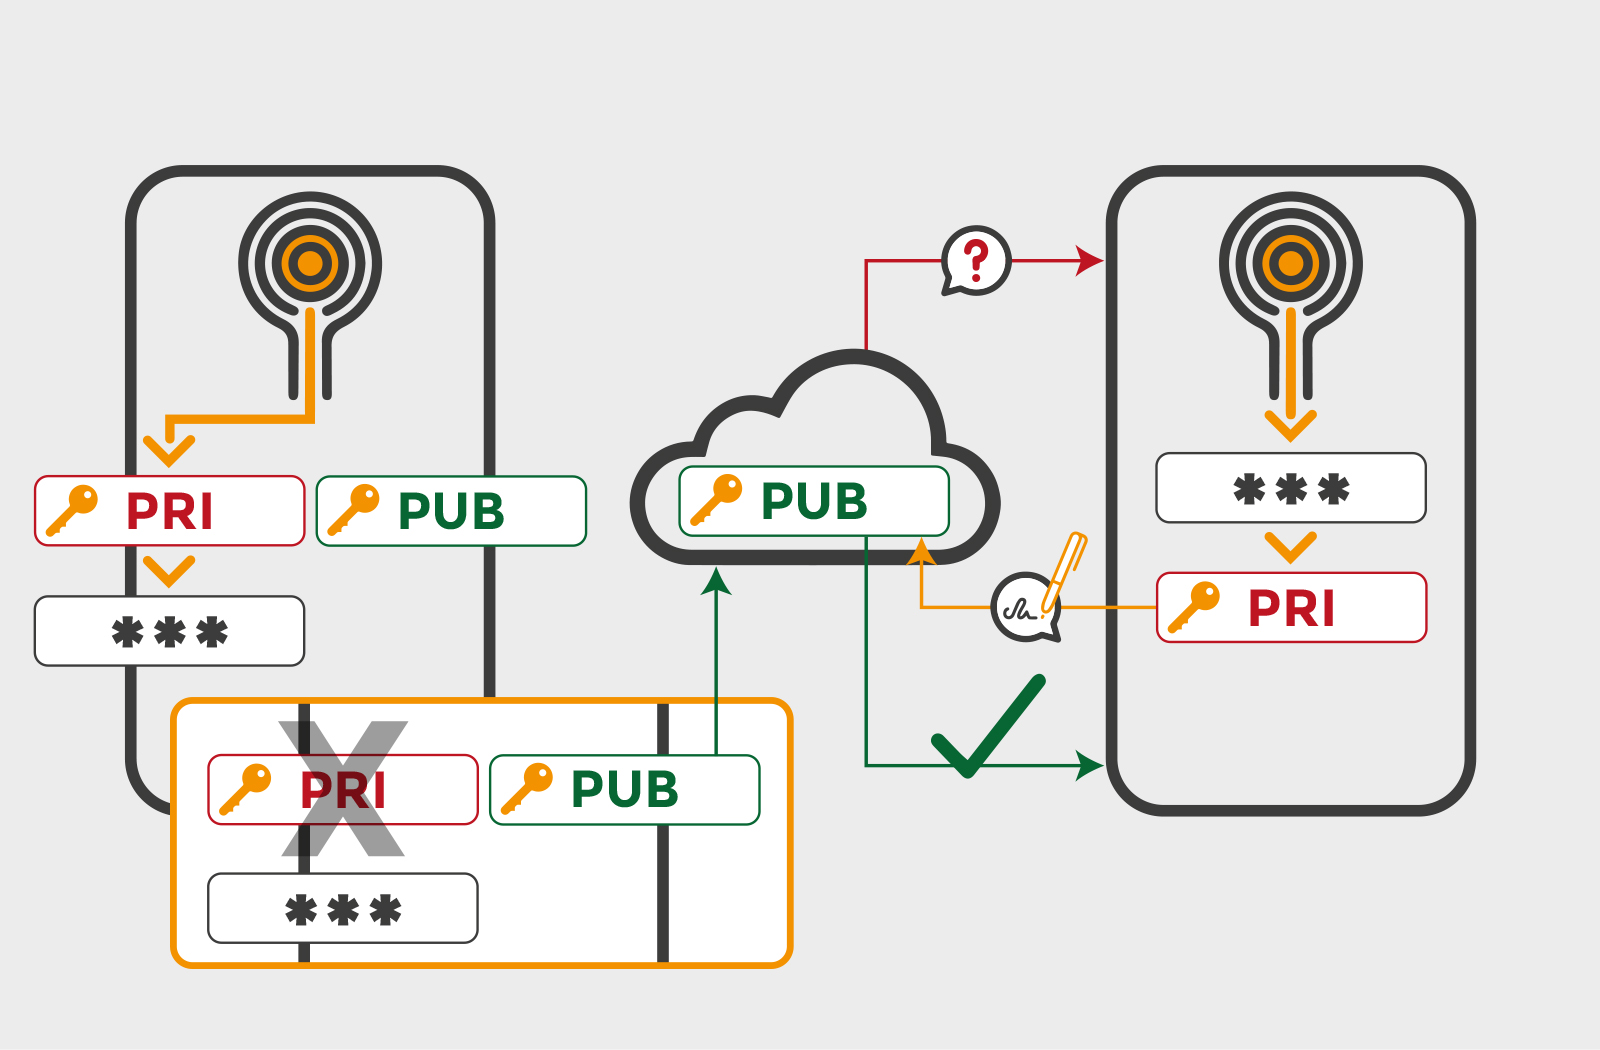
The heart of Toothpic's innovation lies in its utilization of the camera sensor's fingerprint, an inherent and indelible trace known as PRNU (Photo-Response Non-Uniformity). This fingerprint, akin to a biological fingerprint, is specific to each device and entirely random, rendered immutable by the manufacturing processes. Capitalizing on this characteristic, Toothpic crafts a secure linkage between cryptographic keys and the sensor hardware, resulting in an unhackable, unclonable identity unique to every individual device.
By integrating Toothpic's technology into Monokee, enterprises unlock a realm of benefits. Password fatigue, susceptibility to phishing, and the vulnerabilities of shared secrets are swiftly eradicated. Users authenticate themselves using their smartphones, their digital extensions, free from the inconvenience of passwords, tokens, or OTPs. Toothpic's asymmetric cryptography ensures the private key remains exclusively on the device, fostering heightened security by eliminating shared points of compromise.
The Key Protection SDK exemplifies Toothpic's commitment to robust security. It safeguards cryptographic keys against malware and unauthorized access, coupling them with the camera sensor's fingerprint. This secure hardware key paradigm drastically minimizes attack vectors, solidifying the shield against contemporary threats.
In a world where identity breaches loom large and user experience is paramount, Toothpic presents a transformative solution. It reshapes authentication into a process as natural as the touch of a finger, bolstering security without compromising convenience. The amalgamation of camera fingerprinting, asymmetric cryptography, and secure computation constructs a formidable fortress around digital identities. Toothpic is not merely a technology; it is a paradigm shift in the pursuit of a secure, passwordless future.
Use case
Integrating Toothpic's pioneering authentication technology with Monokee's advanced IAM framework establishes a powerful solution for enterprises. This collaboration presents a seamless and frictionless access login for users while maintaining compatibility with SAML, OAuth/OpenID Connect, and legacy systems. Toothpic's hardware-based authentication eliminates passwords, enhancing security and convenience. Leveraging Monokee's Visual Identity Orchestrator, users authenticate effortlessly using their smartphone's unique attributes.
This integration extends beyond simplicity, enabling Monokee to deploy passwordless strong Multi-Factor Authentication (MFA) across applications.
Enterprises benefit from enhanced security without compromising user experience. With Monokee's readiness for Self-Sovereign Identity (SSI), this collaboration offers a future-proof solution that aligns with industry trends. In a landscape demanding robust security and streamlined experiences, the Toothpic-Monokee integration redefines access management, empowering enterprises to embrace a passwordless, secure, and user-centric approach.
The following sequence diagram depicts the interaction between an End-User, the Toothpic system, and the Monokee IAM framework during an authentication process. In this sequence, the End-User interacts with both the Toothpic system and the Monokee IAM framework to securely authenticate themselves using Toothpic's hardware-based authentication. The integration of these systems ensures a seamless and secure user experience throughout the authentication process.
- The process begins with the End-User visiting the login page of an application that is integrated with the Monokee IAM framework.
- Monokee responds by displaying a QRCode to the End-User on the login page.
- The End-User then uses their smartphone's Toothpic app to scan the displayed QRCode.
- Toothpic receives the QRCode scan and initiates its internal process. It generates a cryptographic key and proceeds to authenticate the request.
- Toothpic communicates with its own components, generating the necessary authentication payload and completing the user's authentication process.
- Toothpic forwards the authentication payload to the Monokee IAM framework, indicating that the user's authentication has been successfully completed.
- Monokee processes the authentication payload received from Toothpic and confirms the validity of the authentication.
- Monokee responds to the End-User, confirming that a new authenticated session has been established.
Technical challenges
Defining a suitable challenge for the integration between Toothpic and Monokee is a critical step to ensure the security of the authentication process. The process will be subject to a series of threats:
- Replay Attacks: By including a nonce (a random value generated for each challenge), Monokee ensures that each authentication attempt has a unique challenge. This prevents attackers from intercepting and reusing a previously captured challenge to gain unauthorized access.
- Man-in-the-Middle (MitM) Attacks: Including the issuer and intended audience in the challenge allows Monokee to validate the authenticity of the parties involved. This prevents attackers from intercepting communication between the user and Monokee, as any alteration of the challenge by an attacker would be detected during verification.
- Callback URL Spoofing: Including the callback URL in the challenge ensures that the response is sent back to the legitimate source. Attackers attempting to redirect the response to a malicious site would be thwarted because the callback URL wouldn't match the legitimate domain.
- Session Hijacking: The session identifier included in the challenge enables Monokee to tie the authentication request to a specific session. If an attacker manages to intercept the challenge but lacks the valid session identifier, the authentication attempt would fail.
- Token Theft: Including all the specified components in the signed challenge ensures that the generated tokens are tightly bound to the original request. Even if an attacker manages to gain access to a token, they cannot use it maliciously without knowing the original challenge components.
- Token Substitution: The signed challenge prevents attackers from substituting a legitimate token with a forged one. Any unauthorized modification to the challenge, including the nonce or session identifier, would result in an invalid signature, rendering the token useless.
- Token Misuse: Including the intended audience (recipient) in the challenge strengthens security by ensuring that the generated tokens can only be used with the intended system or service, reducing the potential for misuse.
By incorporating these elements into the challenge and ensuring they are properly signed and verified, Monokee can effectively mitigate a wide range of potential attacks, including replay attacks, MitM attacks, spoofing, session hijacking, and various forms of token-based attacks. This comprehensive approach enhances the overall security posture of the authentication process and guarantees a higher level of trust for users.
As such, the challenge should be a JSON Web Token (JWT) build as follows:
Header {
  jwk: <Monokee public key>
}.
Payload {
  nonce: <rnd>,
  aud: <APK id>,
  iss: "https://toothpic.monokee.com",
  exp: 3600
  iat: <issue time>
  jti: <session id>
  azp: <APK id>,
  callback: "https://toothpic.monokee.com/webhook/[...]"
}.
Signature
Adding the request type (approval or signature) and the Key ID (kid) to the challenge is crucial for enhancing the security, control, and flexibility of the integration between Toothpic and Monokee. Here's why this addition is necessary and how it affects different scenarios: The inclusion of the request type (approval or signature) allows Monokee to distinguish between two distinct scenarios: one where a specific secure hardware approval is required (approval request), and the other where any available key can be used for signing (signature request). This differentiation ensures that the appropriate authentication process is triggered based on the specific needs of the scenario.
Controlled Hardware Approval (Approval Request): In cases where a specific secure and controlled hardware approval is necessary, Toothpic can sign the challenge with a default key (identified by a kid or a JWK thumbprint). This action signifies that a designated hardware device has approved the authentication request. Monokee can then recognize this signature and authentication as originating from an authorized and verified hardware device, adding an extra layer of trust to the process. This scenario is particularly useful in contexts where stringent hardware-based security is required.
Flexible Key Usage (Signature Request): When requesting a signature for the challenge without specifying a particular key (signature request), the public key used to sign the challenge becomes the identifier for the user in Monokee. This approach allows for more flexibility in the authentication process, as any key associated with the user can be used to sign the challenge. It accommodates scenarios where the user might have multiple keys or devices for authentication.
The JWT should thus include two additional claims:
  req_type: <approval|signature>
  kid? <kid requested for approval>
By embedding the request type and kid in the challenge, the integration between Toothpic and Monokee gains granularity and versatility in managing authentication scenarios. It empowers both systems to cater to different use cases, ensuring optimal security and user experience in various contexts. For example:
Enhanced Security for Controlled Devices: Adding the request type and kid can be pivotal in scenarios where only specific hardware devices (approved by Toothpic) are authorized for certain operations. This ensures that the authentication process is tied to trusted, controlled, and secure devices.
Multi-Key User Authentication: The inclusion of the request type and kid also caters to users who possess multiple keys for authentication. This flexibility allows users to choose the appropriate key for signing based on the context or device they are using.
Adaptive Authentication: Monokee can adapt its authentication flow based on the request type and kid. For example, if an approval request is received, Monokee can implement more stringent security measures due to the controlled hardware approval process.
Solution
By splitting the process into two user journeys, Monokee efficiently manages both the initial authentication flow and the subsequent callback communication. This approach enhances security by allowing Monokee to handle and verify the signed challenge separately from the session unlocking process. It also ensures a seamless and orchestrated experience for the end-user, where authentication and session access are managed in a coherent and secure manner.
Authentication Flow
Challenge Creation: Monokee generates a unique challenge that includes the necessary components such as nonce, issuer, callback URL, intended audience, and session identifier.
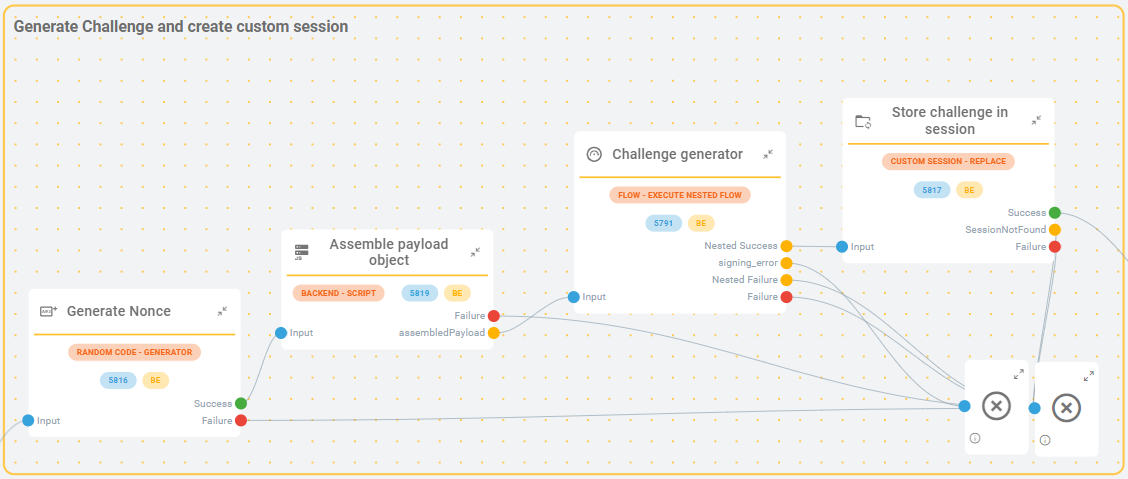
Figure 2 - Monokee Create Challenge Example of generated JWT:
eyJhbGciOiJFUzI1NiIsImp3ayI6eyJjcnYiOiJQLTI1NiIsImt0eSI6IkVDIiwieCI6Im1EV3hkSFRjT0hXMm44UFVyNkJ2QWlFaTIteEhqZ2Q2TndnakZCSFF5cTgiLCJ5IjoicDVGaUUxYTlFeXNXNFY1NlJvQlFGb1BFMUNXRTREUzRHMmtXS0dDQnZ1ZyIsInVzZSI6InNpZyIsImFsZyI6IkVTMjU2Iiwia2lkIjoiZGYzNDU1MmUtNzIxZi00ZTUxLWEzZDctNDcwMzE0N2Y3ZjViIn19.eyJjYWxsYmFjayI6Imh0dHBzOi8vdG9vdGhwaWMubW9ub2tlZS5jb20vd2ViaG9vay8_Zmxvd19pZD0yMDQ0ZWEzNy0yYjg1LTQzYTYtYjA0Yy0xY2ZjZTVjMmE5NjgiLCJub25jZSI6IjE3NTM2ZGU1LWE3MjMtNGFkNC04MWYyLTk1NjUzZjQzNjRkYSIsImF6cCI6ImNvbS50b290aHBpYy50b290aHBpY21vbm9rZWUiLCJqdGkiOiI3YjM5OTZjOC04YjA5LTQ5NzktYThkMC0yMmQyNWY2Y2EzZGEiLCJpYXQiOjE2OTExNDQ2MDAsImlzcyI6Imh0dHBzOi8vdG9vdGhwaWMubW9ub2tlZS5jb20iLCJhdWQiOiJjb20udG9vdGhwaWMudG9vdGhwaWNtb25va2VlIiwiZXhwIjoxNjkxMTQ1MjAwfQ.JeH1_L8TkWcd8DuERfrF1f3hh9AjZDe0KVfBVwgLoqLoLB0TN5Za5RFWZzt6qEYz-UO_bIrOY4MaA8Ry1pA1KAWhich decodes to:
{
"alg": "ES256",
"jwk": {
    "crv": "P-256",
    "kty": "EC",
    "x": "mDWxdHTcOHW2n8PUr6BvAiEi2-xHjgd6NwgjFBHQyq8",
    "y": "p5FiE1a9EysW4V56RoBQFoPE1CWE4DS4G2kWKGCBvug",
    "use": "sig",
    "alg": "ES256",
    "kid": "df34552e-721f-4e51-a3d7-4703147f7f5b"
}
}
.
{
"callback": "https://toothpic.monokee.com/webhook/?flow_id=2044ea37-2b85-43a6-b04c-1cfce5c2a968",
"nonce": "17536de5-a723-4ad4-81f2-95653f4364da",
"azp": "com.toothpic.toothpicmonokee",
"jti": "7b3996c8-8b09-4979-a8d0-22d25f6ca3da",
"iat": 1691144600,
"iss": "https://toothpic.monokee.com",
"aud": "com.toothpic.toothpicmonokee",
"exp": 1691145200
}
.
JeH1_L8TkWcd8DuERfrF1f3hh9AjZDe0KVfBVwgLoqLoLB0TN5Za5RFWZzt6qEYz-UO_bIrOY4MaA8Ry1pA1KA
QRCode Display: Monokee initiates an authentication flow by displaying a QRCode containing the challenge. This QRCode serves as an invitation for the end-user to start the authentication process.
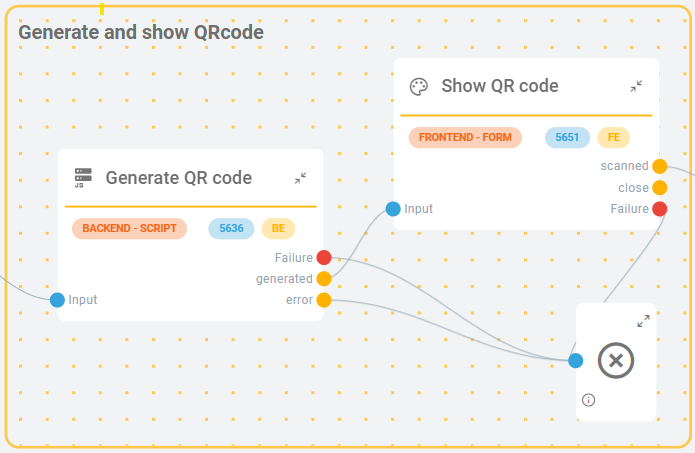
Figure 3 - Monokee Generate QRCode 
Figure 4 - Monokee Show QRCode User Interaction: The end-user interacts with Toothpic's app to scan the QRCode and initiate the authentication process. The app generates a cryptographic key, signs the challenge, and sends the signed challenge to Monokee.
Webhook Activation: Monokee's system receives the signed challenge through a webhook. This webhook acts as a communication channel between Toothpic and Monokee, allowing Monokee to process the authentication response.
Challenge Verification: Monokee's webhook verifies the authenticity of the signed challenge. It checks the signature, challenge type (approval or signature), and key information to ensure the integrity of the response.
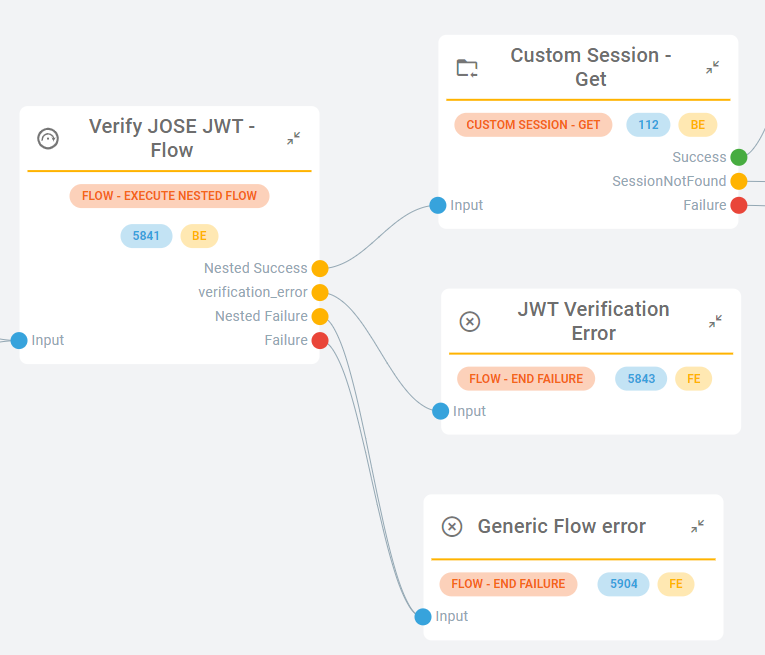
Figure 5 - Monokee Challenge verification Session Unlock: Upon successful verification of the signed challenge, Monokee's webhook unlocks the session that was initially created during the authentication flow. This action grants the end-user access to the desired application or resource, confirming their identity.